Piquant Pico II


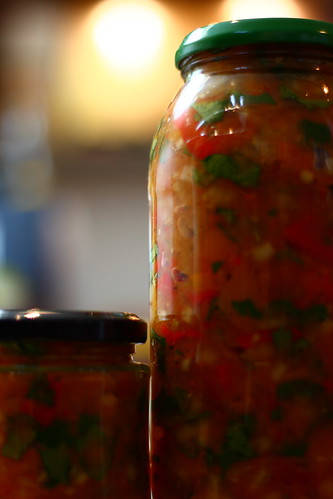
Because yes, we did eat all that Pico de Gallo in just a few days. We tried to make a greater quantity of it this time, in the hopes that it’ll last us through the week. I don’t hold out great hope, however, as this stuff is simply too addictive!

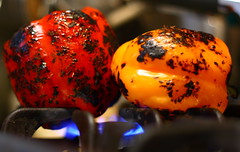
This time, we roasted the peppers and the tomatoes. If you have decent (i.e., not British) tomatoes, then you can probably skip the roasting of them. These babies, though, were truly British tomatoes, meaning that they had a fair degree of crunch to them. Yep – crunch. Think … overripe, yellow apple and you’ve got the level of crunch.

Just so you’ll have it (and so we’ll remember it), here’s the recipe for a truly fabulous Pico de Gallo:


Pico de Gallo

  • 3 large bell peppers, preferably orange or yellow
  • 10 medium tomatoes
  • 3 large cloves garlic
  • 2 large yellow onions
  • 5 Thai Bird chiles
  • 1 small lime
  • 2 Tbsp lemon juice
  • 2 Tbsp white vinegar
  • 1 Tbsp juice from cauliflower pickles
  • 20 grinds black pepper (see note)
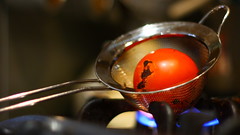
  1. Roast your peppers until they are charred and black looking. Get them as black as possible, as this will make things much easier later.
  2. Tuck them into a covered dish, to sweat for a while.
  3. Roast your tomatoes until the skins pop, making sure you’ve roasted the whole thing. The idea isn’t to blacken, but to loosen the skin. You could blanch them, if you prefer.
  4. Put the roasted tomatoes in with the peppers, and begin prepping your other ingredients.
  5. Finely dice 1.5 of your onions, reserving any large chunks (i.e., near the bulb end where it’s difficult to slice).
  6. Peel your garlic cloves.
  7. Now, revisit your peppers and tomatoes, removing their stems, skins, seeds, and any rough bits from the tomatoes (that central vein is rather annoying sometimes, and difficult to chew).
  8. Put your garlic, 1/2 of one of the onions (plus any extra bits), one of the roasted peppers, 3 of the tomatoes, your Thai Bird chiles, and your juices (including the lime) into a food processor. Puree this until smooth.
  9. Finely chop the remaining 2 bell peppers, and 7 tomatoes.
  10. Mix it all up, grind the pepper over it, and put it in a jar.
  11. Let sit for a day or so, if you can stand to, and it’ll get even better.

Note: “Black pepper,” this week, consists of about 75% true Black Pepper from Sri Lanka, 20% Sichuan Chinese pepper (a.k.a., bird pepper, which was illegal in the US until 1995), and 5% allspice berries.

Piquant Pico

Occasionally, the taste buds get bored.

Oh, sure, you can have your lovely, light, chewy loaves of bread, and your fragrant basmati rice steaming away. You can have your light pancakes and rich cream sauces. But sometimes… you just long for the freshness of summer — roasted vegetables, fajitas, crisp, fresh watermelon, juicy nectarines.

But, alas, at the moment you’re in Scotland. Where it snowed again this week. Twice.

You’ve already started pickling things. It might be time to take it one step further… into pico de gallo-land.

Salsa picada, salsa mexicana — whatever you’ve grown up calling it, pico de gallo, which literally means “beak of rooster” is a sharp, chunky, colorful sauce that goes well as a sort of spicy relish with meat or on top of beans with a bit of sour cream, wrapped into a soft taco. The base ingredients match the colors of the Mexican flag — red, white and green. Tomatoes, onions, and chilies.

That’s just a place to start, of course. When your tastebuds are bored, you can jump off and find yourself in a number of places. Desire is an imprecise map. This is the path we took and we ended up happy.

We started our pico with fire-roasted bell-peppers, mainly because for some people, bell peppers are inedible without the skin removed. The charring gives peppers a smoky sweetness and removes the bitterness that sometimes lingers when they’re sauteéd, and because frankly — pyromania is fun. (Wear sleeves that are tight to your wrists, please. And don’t set the house on fire. You can try this using an electric burner, but don’t touch the pepper to the metal, or it’ll stick. And for goodness sakes, don’t hold it in your hand..!) This time of year, we don’t have too many tomatoes around, so we stretch what we have by using red and yellow bells.

And so, to roast them: with a pair of long metal tongs, take a washed bell pepper, turn on the smallest burner on your gas stove and set the pepper atop it, directly atop the burner. At intervals — mainly when the skin you can see is blistered and blackened — turn the pepper with the tongs. Finito. That’s it. Depending on the size of the pepper and the thickness of the pepper-flesh, this will take between five and ten minutes, five minute per side. You might want to run the fan, since the skin kind of makes the house smell like an illegal recreational drug, I’m told. It just smells kind of rank in the beginning of the process, but then the sweetness of the pepper comes through, and it smells like… fajitas. *sigh*

Don’t be afraid to really roast your peppers — don’t fear the charring, people. Black, black, black is what you’re looking for. Check out this picture from Vegan Yum Yum to see what I mean. Or try it under the broiler. (I should have taken pictures of this stage of the game, but I didn’t remember that people might not know how to do this without a barbecue grill.)

While your peppers are charring, take one large, mild, yellow onion — a mild and sweet Walla Walla would do nicely — and chop it finely. We smashed three cloves of garlic and minced them as well. Place your onion and garlic into a reaction proof bowl. Deseed and chop six large tomatoes (or, in our case, four medium tomatoes and a bunch of wee cherry tomatoes that were left over from a salad) and add to the melee. Carefully mince and add one or two chillies of your choice. We used three Thai bird chillies — which are extremely long and thin and red and pack a punch. You might want to use serranos or jalapeños — after all, that will give you the green for the flag. You could roast these peppers as well, but we chose not to — Thai bird chillies are searingly hot, and roasting a chili pepper simply ups the capsicum level. Since we also added several big grinds of black pepper to this mix and have three cloves of garlic in there too, we didn’t need that kind of firepower. This time.


You can do a ton of things with fire roasted peppers — from a tasty tapanade to just tossing them with capers and green olives and a drizzle of lemon juice and olive oil in capellini — there are myriad options. Right now, though, it’s time to skin them.

If your peppers look irrevocably burnt and inedible, it’s a good sign they’ve charred enough. Drop them into a plastic bag, and leave them to steam gently for about five minutes. You can also use a paper bag. The peppers will have deflated and gone soft and quite moist. You’ll need to rub them with a dry towel to begin to remove the skin — they’ll be cooled some, but not all the way, so be careful. Use a dampened paper towel to wash away the black bits, but leaving some doesn’t hurt. Cut out the core — the stem and the seeds — and mince.

We added two tablespoons of lemon juice and a tablespoon of vinegar, a handful of snipped chives, and freshly ground pepper to taste. If we’d had any on hand, we would also have added about four tablespoons of freshly minced cilantro — or what’s known as coriander here, but the basic recipe is just tomatoes, onions and chilies, so you use what you’ve got. We left this mixture jarred on the counter overnight, so that the flavors had time to mingle in room temperature, and then refrigerated the next day.

It is so tasty, and can be used in tacos and burritos or on nachos — or in the same way that you would use a chutney. Conversely, you could just eat it loaded onto chips with guacamole…. While eating a whole bunch will give you onion breath for awhile, it’s so worth it.

Gingerhead Pancakes

Ever since foodwriter Tea mentioned gingerbread pancakes over a year ago (she’s since moved on to gingerbread waffles), I’ve been thinking of having them the next time I got to lay around and make D. cook. My birthday seemed a good time for that, since it landed on a Sunday.

Now, I adore gingerbread to a disturbing level, and would probably eat it for at least two meals a day if it were possible to do so and still fit through doorways. The third meal of the day would be composed of pancakes. Having gingerbread AND pancakes joined is indeed the perfect marriage (and possibly a way of saving at least two meals a day for things like plums and kohlrabi salad).

The only possible stem in the ginger is the fact that the pancakes must now be vegan, at least when I’m eating at home, and Tea’s original recipe calls for four eggs, and a quarter pound (!!!) of butter. Vegan pancakes can be tricky, too; I’ve eaten them lovingly and heavily prepared, and wanted fluffy, light cakes that I could load with flavor. And so, I did a bit of thinking.

Alton Brown has a really tasty sounding tempura recipe in which he suggests using seltzer water to make the batter fry up crispy and light. I also considered the fact that beer-battered rolls use the lifting effect of the bubbles to raise them, at least in part. Armed with those fuzzy assumptions, I rummaged in the fridge, and came up with a recipe.

Gingerhead Pancakes

  • 2 C AP flour
  • 1 Tbsp. baking powder, 1/4 tsp. baking soda
  • 1/2 tsp. of salt
  • 1 tbsp. ginger
  • 1/8 tsp. cloves
  • 1/8 tsp. nutmeg
  • 1 C milk – I used soy
  • 1 C gingerbeer
  • 1 Tbsp. oil

In a medium sized bowl, mix your dry ingredients thoroughly. Combine milk, oil, and gingerbeer in a separate measuring cup, and use a spatula to fold it into the dry combination. After this point, I assume you know what to do with pancake batter.


These met with quite a bit of favor! They were light and fluffy and surprisingly tasty. The batch we tried with the Dandelion and Burdock brew of the Fentiman’s wasn’t as clearly gingery, but there are many more experimental herbal drinks where that one came from, and flavor isn’t entirely what we were after with using the effervescent drink — the lift was really good, and that’s what counts. To make these even more gingery, however, a tablespoon of fresh, grated ginger or chopped candied ginger might not come amiss. I can’t wait to try adding granola to these babies, which is my normal practice for pancakes. I like my pancakes light — and lumpy. Strange combo, that, but it works.

We don’t normally drink soda so it was a lucky indulgence that the bottle of Fentiman’s was on hand! We do try to keep a little plain seltzer water in the house, which would work just as well as soda in the batter but you might add a teaspoon of sugar to the mix, just to help the batter brown.

Aaaand, if you’re like us, and live in a country where maple syrup isn’t available without bartering limbs? You can make a reasonably good syrup by yourself. It just takes thinking about it, and a little planning and preparation. Preferably before you realize you want pancakes. Which we did not do. But, oh well. This was our first attempt at vanilla syrup.

Vanilla Syrup

  • 1 C brown sugar
  • 1 C white sugar
  • 1 C agave syrup (or corn, if you prefer)
  • 2 Tbsp. vanilla extract
  • 1 Tbsp. margarine or butter
  • 2 C water
  1. Place vanilla, sugar, and water in a small nonreactive saucepan and stir to combine.
  2. Bring to a gentle boil over medium-high heat. When the mixture boils, stir in butter, reduce heat and simmer until sugar is completely dissolved and syrup is slightly reduced, about 3 to 5 minutes.
  3. Allow to cool, and drain into a bottle for storage, or use warm. The syrup will further thicken as it cools.


The reason we used more than a single type of sugar is to keep the syrup from being able to solidify — combined sugars will keep it flowing. (Unless you have a fridge like ours, and it freezes. sigh.)

Our Martha Stewart-style vanilla is a big old bottle of vodka with scraped vanilla pods shoved in, so it’s quite intense of a flavor, and it really came through in this light and rich syrup. Our success has gotten us a little giddy — we can now imagine a citrus syrup with four tablespoons of lemon zest, and 3/4 c. of lemon juice. Or maybe a pear syrup, with a cup of pear juice to replace the brown sugar, and a teaspoon of cinnamon and one of cloves. Or peach syrup, with cold brewed Earl Grey tea instead of water… Whatever you try, enjoy it, and do tell!

Enjoy your pancakes with grilled fruit (or fresh), nut butter, and the syrup of your (second) choice. If you can’t have maple, this is reallyreally good. And if you can have someone you reallyreally like make all of this for you, then life is really, really sweet.

Garlic Chicken-ish over Rice

You know something’s good when the first, best, and only picture of it is when it’s half-gone, and you can’t really stop to go plate another serving just to make it look pretty. This is one of those cases. Oh, my, this was good … and, by “was,” I mean that there’s none left and our my tongue is strained from licking the bowl.

Garlic Chicken-ish over Rice:
For the “chicken”:

  • 1 yellow onion, diced
  • 1/2 red bell pepper, julienned
  • 3 large mushrooms, halved and thinly sliced
  • 4 servings of chicken substitute of your choice (Quorn pieces, in this case)

For the sauce:

  • 1/2 cup Soy “Cream”
  • 1/4 cup Tofu Sour Cream
  • 2 cups soy milk
  • 4 cloves garlic, finely diced
  • 1 tsp onion powder
  • about 20 grinds of black pepper
  • 1/8 tsp thyme
  • 1 tsp dried chives
  1. Sautee first group of ingredients over high heat until they’re well caramelized, making sure they don’t burn.
  2. Whisk up second group of ingredients.
  3. Turn flame off of first group of ingredients (it’s OK to leave the pan in the same place on the stove, though). You do not want to cook the sauce. Really. Bad idea.
  4. Pour second ingredients over the first, using the liquid to deglaze the pan.
  5. Serve over rice.

This took about 10 minutes to make – and that was ’cause we wash our rice & cook it on the stovetop!

Cauliflower Pickles

Our CSA has been bringing us cauliflower lately. Ordinarily this wouldn’t be a problem, as we’d just whiz it up into a soup. Somehow, though, we’re tired of soup. This poor cauliflower had been sitting around for a week, now, and our box delivery comes again today. So, what to do … well, we’re not going to freeze it (the freezer is full, at the moment). So, we decided to pickle it! That way our house won’t end up smelling like … like what cauliflower smells like when it’s cooking, and we’ll have something spicy as a side-dish.


Hot/Sweet Cauliflower Pickles

  • 1 head cauliflower, separated into florettes (or 1/2 florettes)
  • 1 cup water
  • 1 cup sugar
  • 1 cup distilled white vinegar
  • 1/4 cup balsamic vinegar
  • 1 tsp yellow mustard seeds
  • 1 tsp brown mustard seeds
  • 1 Tbsp chile flakes
  • 1.5 tsp salt
  • 10 allspice berries
  • 20 peppercorns
  • 1/2 tsp caraway seeds
  1. Blanch cauliflower for 1 minute and remove to an appropriate spot to let them cool.
  2. Bring all of your other ingredients to a boil in a nonreactive vessel (we used a glass teapot).
  3. Pack cauliflower into a spring-top, glass jar.
  4. Pour your hot liquid into the jar, leaving enough room for the lid to close without displacing any of the liquid. (Rescue any leftover spices, placing them in with the cauliflower).
  5. Snap the lid closed, wait for it to cool, and remove to a cool place.

Based on a recipe by Alton Brown

We had about 1/4 cup liquid over what we needed, so it’s a close thing – if your cauliflower is on the small side, you may want to double the liquid (you’ll see, in the picture, that I had a bit too much liquid even so … and had to remove some to close the jar). Also, the original recipe says to refrigerate … but we’re thinking that, hey, it barely gets above freezing during the day, so our wonderfully single-paned window ought to keep this cool enough (whereas the refrigerator might freeze it, depending on the mood it’s in).

Enjoy!

DISCLAIMER: We like things hot. WE don’t think they’re hot … but, chances are, you WILL. Unless you’re into hot things. If you’re not … drop the quantity of pepper flakes to about 1 tsp.

Vegan "Sour Cream"


One of the things we’ve wished for, in our move towards being vegan (aside from cheese), has been sour cream. This has been particularly true when eating anything resembling Mexican food. I’m sure you can see where this is going, but before we get there, let’s ask, “Why didn’t we think of this earlier?” It’s not like there aren’t other products out there (e.g. Nayonnaise, soy salad dressings, etc.) which were pointing the way.

But we’ll just chalk this lack of imagination up to the fact that when I’m not working, studying, on my way to the university (taking pictures along the way), I’m editing those photographs. Life … has gotten very busy. Sorry for the lack of creative food & crafts here, as of late, in other words.

This can hardly be called a recipe, really, but here it is, based on something found out there in the great random-recipe-regurgitator known as Google.

Vegan Sour Cream:

  1. 1 block silken tofu
  2. 2 Tbsp lime juice
  3. 1 tsp oil-of-your-choice
  4. 2 tsp distilled vinegar
  5. 1/8 tsp salt
  6. 1 tsp sugar

Notes:

  1. It doesn’t matter if it’s firm or soft tofu, it just has to be silken.
  2. You could use lemon juice instead of lime juice – the original recipe did – but we had lime on hand, so that was the choice.
  3. Adjust the oil quantity to match your taste for the richness of sour cream. The original recipe called for 1 Tbsp of oil, which we cut to 2 tsp, and was still a bit much.
  4. The quantity of vinegar … really didn’t seem to matter. We added more and it didn’t have anywhere near the impact of adding more lime juice, so feel free to omit it altogether.
  5. Feel free to adjust this upwards, as well, to possibly 1/2 tsp or so. We tend to skimp on the salt & add it on an individual basis.
  6. We did it. We’re confused by it. We may omit it next time, because … well, is sour cream really at all sweet?

Blend it with an immersion blender (or whatever you’ve got) until it’s creamy and adjusted to your taste.

It couldn’t be easier, and is absolutely wonderful. The lime is a wonderful addition, particularly for use with Mexican food.

A Kohlrabi Pickle

Branston is a well-known brand of savory foodstuff people here in the UK enjoy. They make what’s called Branston Pickle, which is pickled …stuff. The wisdom of Wikipedia™ assures me it’s “swede (rutabaga),carrots, onions, cauliflower and gherkins pickled in a sauce made from vinegar, tomato, apple and dates with spices such as mustard, coriander, garlic, cinnamon, pepper, cloves, nutmeg and cayenne pepper.” That’s actually quite a few more vegetables than I expected.

Because of the dates, and perhaps because of the tomatoes, this pickle stuff is a brown, sticky sauce that’s horribly sweet — horribly to my mind, anyway, because in the land of pickles, I’m a dyed-true dill girl, and I loathe sweet gherkins or cornichons. I’ve often been offered pickle-and-cheese sandwiches here, and then regretted accepting them, having forgotten that pickle here is not the same as pickle elsewhere. But I digress! The reason I called this post Kohlrabi Pickle is because we eat our kohlrabi…vaguely pickled. Kind of pickled. At its best, it’s crunchy and salty-sweet and tangy, and lovely. And it’s kohlrabi.

I admit that I’ve never eaten kohlrabi cooked. It’s a Brassica member, and just smells too much like broccoli when it’s cooking, which, as you know, smells like something old from the bottom of the trash. Our CSA sent out a recipe for kohlrabi curry in their last vegetable box, which we greeted with the suspicion it deserved. “It’s not actually a root vegetable, no matter what they think,” I thought to myself darkly. “It grows on top of the ground.

Most of the time when people get kohlrabi in their veggie boxes, they’re a little terrified. Nobody seems to know what to do with it. Wrongly, the Germans consider that stuffing it with pork and seasonings is a good idea. The people who purée it are wrong, as are those who braise, boil, stir-fry, or foil-wrap and grill it. Covering it in cream, sautéeing it with oily fish, frying it into cakes and serving it with chicken, or seasoning it with ginger and cinnamon and baking it for a brunch — no, no, no.

Kohlrabi – ur doin it rong.

The only way to eat kohlrabi is raw.

Observe: Here is how we eat kohlrabi.

  1. Peel, skin, and julienne your kohlrabi.
  2. Make some kind of peppery sauce including vinegar. This is the pickle-y bit.
  3. Eat it.

That is all.

Oh, all right, all right. I concede, in the face of finger-pointing, stomping, whining, raging foodies, that perhaps, and just maybe there are other ways of eating kohlrabi. Maybe in …oh, empanadas. Or something. But mostly, you people are just wrong if you’re not eating it at all. That I won’t take back. You should be eating this.

I used to be one of you. I was frankly scared of kohlrabi, because it looks like the feathered appendages of a molting alien — the purple ones were worse more than the whitish green ones. It smelled weird, the leaves were rubbery looking, and it was too unfamiliar, so my internal nine-year-old said, “Oh, no, no, no,” and that was that.

People! Do not let the nine-year-old run your life! She was wrong about boys, too.

(Well, maybe not all wrong about boys.)

Kohlrabi can be eaten much like som tam, or green papaya salad, without the fish sauce (unless you want that). The spiciness of the chili flakes combined with the sweetness of honey or agave, the saltiness of soy sauce, and the piercing tang of vinegar — makes it simply delish. You can add julienned green beans, chopped cilantro, bean sprouts, match-sticked green onions, a few slices of seeded tomato, a spritz of olive oil and a handful of chopped peanuts, if you’re not in a hurry. If you just want to take your kohlrabi straight, though, while you’ve got your head in a book, you need no other vegetable to make it a very tasty, crunchy, peppery-sweet fresh salad. Your pictures won’t be quite as photogenic that way, but you should be eating it, and not taking stupid pictures anyway (note the half-eaten bowl, there).

I am startlingly enthusiastic about kohlrabi, and I really think everyone should eat some. Now.

Go on, then.

And, okay: if you actually have some recipes that include kohlrabi cooked that you’re absolutely positive a.) don’t smell like the bottom of someone’s intestinal tract and b.) don’t taste yuck, my inner nine-year-old is taking suggestions in the comment section. But she’s only reading them, and probably turning her nose up, and going outside to clomp around in her boots and kick rocks in the alley. (She tends to be grumpy when not reading fantasy novels and stuffing herself with banana bread.)


Further Evidences of a Really Bizarre Universe: Knitter graffiti.

Further Evidences of a Really Good Universe: food blogger Pille and K’s new sous chef. Congratulations, she’s a gorgeous little dish!

Crunchy Granola

Ah, university days.

Or, for me, it was high school days, and possibly elementary school days.

My name is Tadmack, and I’m a cereal-a-holic.

And isn’t knowing half the battle?

I always thought that admitting it was the other half, but we all work on our sobriety cereal issues in different ways, right? Let’s all be generous here. This is a safe place.

Every food blogger has those low moments, don’t they, when trying to create another picturesque meal just isn’t in the cards? When they have ten thousand pages to read and write up before May, or suddenly the end of January is looming, and they’ve blown past all of their self-made deadlines, and a real one is approaching at a fast clip? Things are busy. The laundry is piling up, and it’s a choice between clean socks or a perfectly photographed meal. The smart money is on doing laundry with a bowl of cereal cradled in your lap while you turn pages in your book, with the dryer chugging along in the background. Cereal is the king queen president of foods, especially when you’re busy.

But, not just any cereal. Not that sugar-frosted crap that cuts up your gums. Let’s be realistic. This is a food blog, and anything with the word “captain” or “count” in it doesn’t count as such.

Now, any cereal-a-holic knows that The Really Good Stuff is expensive. Anything that contains actual fruit or more than one kind of grain, anything that goes by the fancy Swiss moniker of “muesli” is going to cost you. But before you dig out all the change in your couch and blow your stash on something pricey, think about this: You could just make your own. Museli — which is untoasted and uncoated — or granola, which is coated with melted sugar and is toasted — either way, making your own excellent meal-in-a-minute is really simple. You already know what The Good Stuff has got in it, right?

Pretty Decent Granola (Base)

(Adapted from a recipe courtesy of Alton Brown)

  • 3 cups rolled oats
  • 1 cup roughly chopped almonds
  • 3/4 cup flax seeds
  • 1/4 cup shredded sweet coconut
  • 1/4 cup dark brown sugar
  • 2 tablespoons coconut milk or water
  • 1/4 cup vegetable oil
  • 3/4 teaspoon salt
  • 1/2 cup raisins
  • 1/2 cup dried apricots, chopped
  • 1/2 c. cranberries, dried
  • 1/2 c. dried pineapple, blueberries, or anything else you think goes

Basic directions, feel free to disregard

  1. Preheat oven to 250 degrees F.
  2. In a large bowl, combine the oats, nuts, flax, coconut, and brown sugar.

    In a separate bowl, combine maple syrup, oil, and salt. Combine both mixtures and pour onto 2 sheet pans, or else bake in separate batches. Do not make the mistake of thinking that shoving it all into one pan will work. A word to the wise, here. Cook for 45 minutes, stirring every 15 minutes or so to achieve an even color.

  3. During the last fifteen minutes, you can add your dried apricot to this mixture if it’s particularly sticky, but otherwise, don’t add any of your fruit. You know what burnt raisins taste like? I do. You’d think I could actually pay attention and think things through before just dumping everything into a pan, but the call of the cereal is hard to resist… sigh
  4. Remove from oven and transfer into a large bowl. Add raisins and mix until evenly distributed.


Now you can safely go back to trying frantically to finish whatever it is you procrastinated on so badly that you had to eat cereal for dinner. You’ll find that muesli is even easier to make, as it doesn’t involve any of those pesky toasting options, and you can just leave your options open to add sugar to individual servings or not. (I’d skip the maple syrup, oil and salt altogether, however.)

Making your own granola is so very much less expensive than buying it at the store, you’ll wonder why you don’t do it all the time.

And then you’ll look down at your procrastinated on projects, and you’ll know the answer.

*sigh

Some Kind of Pot Pie

The problem is, I don’t really like pastry.

I have been known to eat the middles out of pies. I tend to leave the casings of sausage rolls and filled pastries. This makes me really, really weird, I realize that. Part of the problem is that growing up, I didn’t like the way oily things felt in my mouth — so shortbread was out, making me the lone child who didn’t enjoy seeing the tin of Dutch Christmas cookies arrive each year. I love small plates, and appetizer-y things like samosas — but only one of those a year is fine, sadly, or I feel a little sick. Bear claws or other store-bought Danishes, and laminated doughs of all types have made me a little queasy, and if the pastry is a minute past fresh, or I can taste or feel the oil on my mouth at all — oh, no. Bad, bad times.

Arriving in Glasgow, Land of the Fried, Home of the *Braue, this pastry aversion presented somewhat of a problem. There are tons of tasty Scottish items which are concealed in pastry, or fried (egg rolls — which are not Chinese food, I discovered. Egg+hamburger bun+frying= egg roll), and butter is, of course, as well-loved here as it is at home. (Paula Deen heaven, people.) Lovely Scottish shortbread, buttery crisp oatcakes, and the ubiquitous Scottish (vegetarian) sausage roll all presented a challenge (meanwhile, D. eats them up happily, claiming my forebears come from people who apparently ate leaves and twigs, while his properly ate fat and fish). I wanted to embrace the food of my current residence, but didn’t know where to begin.

I purchased a package of frozen pastry, deciding to start small, and make something with minimum effort. Unfortunately, nothing really suggested itself until one of those bitterly cold afternoons when I was expecting D. to come home frozen from school. He came in while I was hauling out ingredients, and frowned.

“Why aren’t you using the broccoli?”

“In pot pie?”

We then had one of our long, rambling and ridiculous discussions about what goes in what; my take was that broccoli never goes in pot pie, his view was that whatever you put in it goes quietly, or you should probably have killed it first.

We compromised by me sitting down and reading a book while he futzed with the broccoli, then lost interest.

(You see the rate at which dinner is prepared? You’d think we’d be much thinner, but no.) Eventually we returned to our project, and put together:

Some Kind of Pot Pie

  1. 1 whole onion
  2. 1/4 c. frozen corn
  3. 1 clove of garlic
  4. 3 chopped carrots
  5. 1 cup of the stems of fresh broccoli
  6. 1/2 c sliced mushrooms
  7. 1 package of silken tofu
  8. 2 c. frozen Quorn bite-sized “beef” chunks
  9. 1/2 c. milk or water,
  10. 1 tbsp. cornstarch
  11. 2 tsp. lemon juice
  12. various crumbled herbage, including chives, oregano, garlic and onion powder, black pepper and salt to taste,
  13. And one package of store-bought puff pastry


We started by using a stick blender and combining the tofu, milk and cornstarch, making the silken tofu into a kind of sauce. (If you’re not using tofu, you could just make a white sauce.) Next we threw in our herbs, spices, pepper and salt. Finally when we had a creamy sauce we dumped everything else in and gave it a quick stir, just to be sure everything was coated. This is a one-dish casserole, and so we left it in the dish in which it was combined.

We intended to use the puff-pastry normally — take it out of the package, roll it out, etc., but D. had the bright idea to use the pizza cutter and slice the puff pastry against the grain. Together we wove it in a vague approximation of a basket-weave. We then popped it into the oven for 40 minutes, not because it really needed to cook for that long, but because we mostly forgot about it ’til we could smell it.

(Oh, come on. Honestly: isn’t this how many of your dishes begin and end?)

This was not a picturesque, pretty dish, but you know, most of the time, that just doesn’t matter. It was hot and savory and filling yet light — one of those really, really surprisingly good casserole-y meals that just worked well. And best of all, I really liked the top. It might be because there was no oil or fat whatsoever in the filling — the laminated pastry topping provided just enough richness to make a tasty dish, but not too much.

After that accidental beef-esque pot pie, I’m feeling brave, and may take on some of the recipes which have eluded me like pasties or the lovely tomato tarts I’ve seen other people make. Eventually, I may even learn to like D’s guilty pleasure dessert, millionaire shortbread!

But, for some reason, D. says that’s not really necessary.


*Splendid and brave, of course.

Apparently, I should also be trying to learn how to make a Brack this year… Oh, the horror.

Honey Oat Bread

Honey Oat Bread

  • To prepare the oatberries:
    • 1 C Oatberries
    • 4 C Filtered Water
  • For the initial proofing of the yeast:
    • 3 C Filtered Water
    • 1 Tbsp Yeast
    • 1 Tbsp Brown Sugar
  • For the bread itself:
    • 1/4 C Honey
    • 1 C Oat Bran
    • 1 C Flax Seeds (Linseeds)
    • 2 tsp Salt
    • 1/4 C Vital Wheat Gluten
    • 1 Vanilla Bean, scraped
    • Whole Wheat Flour – have a 5lb / 2kg sack on hand
  • For the final forming of the loaves:
    • Rolled Oats (Quick Porage Oats)
    • Olive Oil


  1. Boil your oatberries until they have absorbed all of the water they’re going to. Be careful, as they’ll boil over if covered. You could steam them, if you had a steamer, in which case reduce the amount of water to 2 cups and steam for 45 minutes.
  2. After the oatberries have cooked, remove from heat and let cool while you’re proofing your yeast.
  3. Microwave 1 cup of your water until nearly boiling, add 2 cups of cool / room-temperature water, and mix in sugar and yeast. Let this stand until yeast gets nice and bubbly (around 10 minutes or so).
  4. Combine oatberries, yeast ferment, honey, flax seeds, oat bran, and vanilla bean.
  5. Mix thoroughly, making sure to break up the vanilla bits
  6. Add in enough flour to get a good dough going, mixing with a spatula until you are able to knead it. (You could cheat and throw it into your food mixer until it’s the consistency of bubble-gum.)
  7. Knead until you feel like your arms will fall off or until the dough won’t easily absorb any more flour
  8. Set aside in a reasonably warm place (we put it into the oven – not turned on, obviously) until more than doubled in size (this took us about 2 hours).
  9. Gently knead for a minute or so, just to distribute the yeast again (it’s been sitting in there, eating, and is probably close to starving by now, and may have reproduced; it doesn’t have any legs, either, so you have to take it to the food).
  10. Separate into 3 equal sized balls.
  11. Form into loaves.
  12. Oil your pans well.
  13. Place loaves into pan.
  14. Liberally sprinkle the rolled oats over the tops, and then … perform something of the sort of action one usually performs with an omlette, tossing the loaf pan about so that the bread rotates through the oats. Yes, this is odd. It’s the way I do it, though, and it works. You can roll your loaves through the oats and then place them into the pans, if that makes you happy, but it’ll just dirty another dish.
  15. Let rise until more than doubled in size (this took about an hour, this time).
  16. Bake at 300F / 150C until internal temperature tests to greater than 195F / 90C (or until you think it’s done, if you’re that good at guessing).
  17. Remove to wire racks immediately and let cool thoroughly before slicing.