#1 New Year’s Resolution…

…record recipes that we like on the baking site so that, when we’re in a strange kitchen far away from our ratty baking notebooks, we’ll know how what the heck we’re doing.

How bizarre. A quick check through the many breads and dishes we have on this site, and we discovered –far from home — that we had NO banana bread recipe on WIWB. None. Zero. Zilch. And we make banana bread so often that it makes no sense that we’ve never written it up!! What on earth is the matter with us?

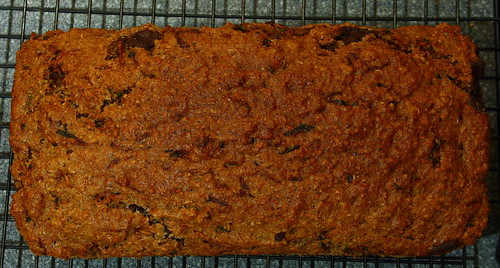
Maybe it’s because most people have their own banana bread recipes — tried and true things they’ve had handed down from their mothers and grandmothers. Or, maybe because we’re experimental cooks, and rarely, if ever, make the same thing twice. Whatever our reasons — here’s a basic recipe that makes a really satisfying but basic banana bread. Feel free to jazz it up — adding raisins, candied ginger, citrus peels, or chocolate chips to make this loaf your very own. It’s perfect for tea or breakfast.

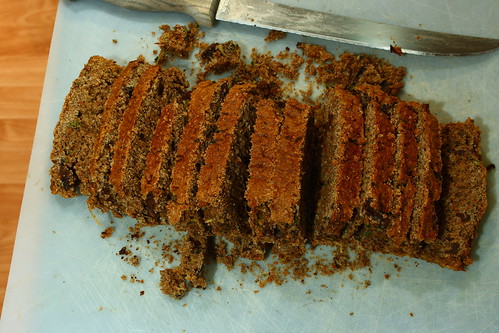
Here’s our most basic recipe — and it’s the lightest, most flavorful bread EVER, whether you add the two eggs or go with the flax or use yogurt in lieu of lemon juice. It’s so, so good, and we’re eating it tonight for dinner. And, eventually something else…

Basic Banana Bread

  • 3/4 c. brown
  • 1/4 c. white sugars (1 c. in all – I use two sugars to keep it moist)
  • 2 c. flour
  • 1 tsp. baking soda
  • 1 Tbsp. baking powder
  • 2 teaspoon freshly ground cinnamon
  • 1/2 teaspoon allspice
  • 1 teaspoon salt
  • 3 Tbsp. flax seeds, ground, plus 6 Tbsp. water
  • 1/2 c. soy milk
  • plus 3 tbsp. lemon juice, OR 1/2 c. plain yogurt

  • 1/2 c. oil
  • 4 large ripe bananas
  • 1 teaspoon vanilla

  1. Preheat oven to 350°F/175°C
  2. Sift together your dry ingredients, excluding the flax seeds, because they replace eggs, and we consider them… liquid.
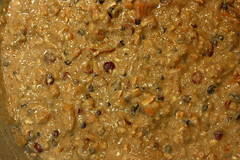
  3. In a separate bowl, cream together oil, sugars, bananas and flax/water, lemon juice, and milk. Lightly fold the banana mixture into the dry ingredients with a rubber spatula until just combined and the batter looks thick and chunky. Scrape the batter into two prepared loaf pans.
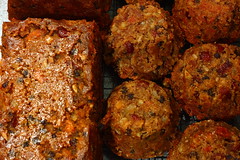
  4. Bake until the loaves are golden brown and a toothpick inserted into the center comes out clean — this can take from 55 minutes if you choose to make one big loaf to thirty five minutes for two small loaves, depending on your oven.


And there you have it. One classic basic banana bread recipe, just add anything.

Our Lady of Leftovers: Still with the sweet potatoes!

It’s just one of those things — after Thanksgiving AND Christmas, there’s always still so much food left! It’s worse for us, since we’re house sitting, and our host left Christmas Day — he just shoved his leftovers in the fridge and said, “Eat up!” Well, we tried. And we’re still trying. But there’s only two of us, and without his three little boys to help, well, we’re kind of stuck.

Without my little ramekin dishes, I’m not inclined to make sweet potato custard, but I did run across several versions of a tender and tasty sweet potato cookie. It’s so far out of what I usually would do with sweet potatoes that we whipped up a quick double recipe. Turned out really well — and I could see substituting mashed carrots, too, if you have any leftover glazed or roasted carrots lurking in the fridge.

Sweet Potato Cookies

  • 1 cup all-purpose flour, sifted
  • 3/4 cup quick-cooking oats – instant packaged oatmeal will work
  • 1/2 tsp baking powder
  • 1/2 tsp freshly ground cinnamon
  • 1/4 tsp salt
  • 1/2 cup unsalted butter or margarine, room temperature
  • 1/2 cup granulated sugar
  • 1/2 cup packed brown sugar
  • 1/2 cup packed sweet potato mash
  • 1 egg OR 1 tbsp. freshly ground flax seed + 2 tbsp. water
  • 1/2 tsp vanilla extract
  1. Preheat oven to 350°F or 180°C.
  2. Cream butter with both sugars until light and fluffy.
  3. Next, sift together your dry ingredients – flour through cinnamon — and then mix well together with oats.
  4. Lightly beat the egg and add into the sweet potato mash, together with vanilla extract. If you’re using flax seed, mix your water with the vanilla, and then add the freshly ground seeds. Let them sit for about a minute, then beat into sweet potato mash.
  5. Mix in sweet potato mixture into creamed butter and blend well. Then add in the dry flour mixture and combine thoroughly. Your dough will be a bit moist, but never fear! These cookies are quite tender, so this is normal.
  6. Drop the cookie dough by tablespoonfuls. Slightly flatten the doughballs as these cookies do not spread too much. Bake for 14-16 minutes until the edges are starting to brown.
  7. Remove from oven and let cookies rest on the sheets for a couple of minutes to firm up further before removing them to cool completely on a rack. Enjoy! Makes about 26-28 teaspoon sized cookies, and you’ll never get them all in one cookie jar, so eat up!

Those are quite tasty! And now we need something to go with them…

Driving By the Blue Box

(This picture is from the FIRST time we set the table. Four more people showed up, which totally threw off settings and the amounts in our nice wee serving bowls — but hey, we put another leaf in the table and refilled the crystal bowls, and had a good time.)

Happy Continuing Holidays, Craftastic Foody Buddies! Hope your celebrations of Yule, Solstice, Eid, Christmas, Hanukkah, Kwaanza, Festivus, etc. are progressing nicely, and that you’re rolling contentedly toward the New Year.

My sister is 12, and believes the height of culinary genius is mac ‘n’ cheese — in that happy blue box from Kraft. Our mother is vegan, and since she’s the main cook in the house, unless J. buys and makes her pasta herself (or bribes one of three older sisters) she doesn’t often get this treat.

For Christmas dinner, she asked me to make her a Mom-approved mac and cheese — and me without my orange food coloring handy! I knew there had to be something close out there — after all, the big draw to the boxed stuff is that it’s SALTY, not really cheesy, so a vegan version couldn’t be too hard.

Drawing from the incomparably insane Alton Brown as well as from the old-school vegan chef Jo Stepaniak, whose baked vegan mac recipe is practically legendary, we came up with a few slight twists — something close to the boxed stuff, and quite tasty.

A Crafty NonCheese

Tweaked from: The Ultimate Uncheese Cookbook

  • 2 1/2 cups dry pasta rings (Kraft makes one whole wheat — who knew?)
  • 2 tablespoons olive oil
  • 1/3 cup flour (any kind; your choice)
  • 1 tbsp. dry mustard
  • 2 tsp. onion powder
  • 1/2 tsp. paprika
  • 1/4 tsp. turmeric — optional, for color
  • 1 tsp. of cayenne or 2 tsp. Louisiana hot sauce, depending on eaters
  • 1 3/4 cups UNSWEETENED nondairy milk or water, if you prefer (experiment with almond or rice; soy can be too sweet)
  • 1/2 cup sweet/mild onion, finely diced – optional
  • 1/2 cup nutritional yeast flakes
  • Salt and white pepper to taste — and please DO taste it

  1. First, you need to boil your pasta — and you already know how to do that, yes? Because this is not going to be baked, however al dente you prefer the pasta will be how it’s served, so cook it how you like it. To keep it separated and prep it for sauce, you can add a tablespoon of margarine when it’s hot and freshly drained.
  2. Next, you need to make a roux. Grab a heavy-bottomed saucepan, add your oil, and put the pan over medium flame. Before the oil gets hot, dump your flour, mustard and onion powder, paprika, turmeric and cayenne into the pan.(NOTE: If you’re going to add onions, add them immediately after you add the oil, and let them sweat over low heat until they’re translucent. You want them to be finely chopped and unobtrusive to the texture of your pasta and sauce! Only if all your eaters are confirmed onion-lovers should you do this — otherwise go stealth and add the onion powder.)
  3. Let the flour mixture brown for approx. three minutes, and then, whisking constantly with a fork, add your yeast flakes, and then, about a quarter cup at a time, add your milk. Pretend you’re making gravy, and keep that fork moving. Obviously you don’t want lumps. The Rule du Roux is don’t use a high flame — medium/low is your friend.
  4. This sauce mixture should cook down for about ten minutes — keep your flame low! — and be ready to be poured onto your pasta. Taste it first before you add to the pasta, and tweak the salt/pepper content. Begin with a teaspoon of salt and go from there. Especially if you’re using whole wheat, avoid over-stirring the pasta and sauce mixture together, as you need it to stay creamy and saucy, not sticky and starchy. Serve hot, with a few grinds of fresh pepper or chiffonaded marjoram or thyme.

Mom and I stuck fairly closely to the recipe the first time through, but immediately afterward, my mind was buzzing with inspiration as to how I could add to this — and make it better. Thin slices of onion. Garlic powder. Smoked yeast. Peas and chopped spicy sausage. And why not bake it? A quick cup of whole wheat panko breadcrumbs, sautéed with margarine to seal in the crunch, nicely tops this pasta, and baked for fifteen minutes makes a nice side dish. There’s tons of stuff to try, if you’re in the mood.

All that matters to me, of course, is that my sister likes it.

Sweet Success

After the EPIC fail and the loss of our precious starter, Sadie, we were pretty blue. We’ve been baking bread for ages, and nothing prepared us for that whole… disgusting, gummy, horribly-sweet smelling… goo that was the inside of what should have been a toothsome, wholesome loaf of bread. *Shudder*

After we buried Sadie in the trash, we were in search of something quick and simple and — satisfying to make for D’s oral PhD presentation on Tuesday. Because his presentation takes place in an open forum — where any and everyone is basically there to critique one’s arguments, we figured we could glue a few critical mouths closed with some judiciously applied peanut butter. Celine’s recipe provided a tasty looking and clearly written jumping off point for us, and we only adjusted our recipe slightly from there.

Peanut Butter Cups

  • 20 cupcake liners – should be mini, but use what you have. Ours were larger
  • 3/4 cup dark chocolate chunks, or 10 ounces of 70% dark chocolate, broken
  • 2/3 cup natural creamy peanut butter + 2 T to add to the melted chocolate
  • 1/4 cup powdered sugar + 2 T in which to roll log
  • 2 T pure vanilla extract
  • 1 T ground ginger, optional
  • optional pinch fine salt – we didn’t add extra, but you may prefer to

First, set out your cupcake liners on a cookie sheet. You’ll want to move them as a unit when they are filled, and you’ll regret your messy hands later if you don’t do this step now.

Then, melt your chocolate. We first set our chocolate chips in a bowl and …left them on the radiator for an hour or so. This melted them very slowly and thoroughly. If you have a house without this nifty radiator option, break your bar into small chunks and microwave on high. We checked our chocolate every thirty seconds, and it took a minute and a half in our microwave to achieve meltage. When the first chunks melted, we simply added our two tablespoons of peanut butter and stirred until the rest of the chocolate succumbed. Melting the remaining chocolate this way prevents burning and allows the chocolate to keep its tempering.

Next, we spooned one teaspoon of melted chocolate into the bottom of each cupcake liner.

Then, in a separate bowl, we combined the rest of the peanut butter, the powdered sugar, and the vanilla. The peanut butter stiffened up fairly rapidly, so we turned it out on a plastic cutting board to knead it for a minute or two, to be sure that the sugar was well incorporated. We rolled it into a log and cut twenty one inch slices from the roll. Natural peanut butter won’t let you fiddle with it for too long without getting even less malleable, so be fairly quick about this step!

Next, we took each of the little slices and flattened them and set them right in the middle of the first chocolate layer. If you use mini-cupcake liners, this is probably a lot harder, and using Celine’s method of coating the liner might be easier. We did it this way so that we could easily and quickly fill all twenty cups, and be ready for the final step.

In between working with the chocolate, we replaced it on the radiator. If you need to, you can zap yours for another ten to fifteen seconds in the microwave.

Finally, we added one generous tablespoon of powdered ginger to the last of our chocolate, stirred it thoroughly, and then ladled one generous tablespoon of chocolate atop each of the peanut butter slices.

And that’s really it. Chill your beauties in the fridge for forty minutes to an hour. They set beautifully — have that distinctive peanut butter cup fluting on the edges when the paper is pulled away — and melt on your hands almost instantaneously, so by all means, pop that sucker in your mouth!


After the bread disaster, our small daily eating successes — a gorgeous crock of zesty mustard, a rustic “beef,” penne pasta and black kale stew, and now this quick and fun treat — sort of salve the loss of losing our starter, and having to deal with an oven which requires the bread to be turned repeatedly so that it will cook evenly (!#$%Z^%&*@!). Eventually, we’ll live in a house with a model kitchen — but that’ll probably be in a house we own and that’s three long years and a graduation from now. Still! Success is success, and you can’t argue with salty-sweet, addictive, peanut butter cups! These things are truly amazing.

Look forward to more baking and experimenting through the holidays as soon as we get home and in a decent kitchen…!

Thanksvegging

We have declared… a goof off day. D. skipped a class, and stayed in bed with the heater on until the house warmed up, T. happily watched kids’ TV and concurrently read a book. It’s cold, and elsewhere it’s almost Thanksgiving, and some days, you’ve just got to veg.

Remember that big zucchini I mentioned? And my friend Alkelda’s gift of chocolate ginger candy bars that I used in my cookies? Together they made an amazingly tasty chocolate chip zucchini bread. Zucchini bread — when you’re using fresh zucchini and not dried — is a bread that can easily be too moist, so my recipe uses little excess liquid. If you use eggs instead of flax as a binder, you do have some moisture, but don’t worry if it seems a little dry — when zucchini cooks, it gives up all moisture, and leaves behind little dark green ribbons of color in your bread. (This is adapted from Bread for Breakfast, By Beth Hensperger & Leigh Beisch © 2001, Ten Speed Press)

  • 3 c. AP flour
  • 1/4 tsp. baking soda
  • 1 Tbsp. baking powder
  • 1/2 tsp. salt
  • 1 Tbsp. freshly ground cinnamon
  • 1 tsp. allspice
  • 3 large eggs OR 1/4 c. ground flax (+ 1/2 c. water, for flax)
  • 1/4 c. applesauce
  • 1/3 c. oil
  • 1 c. brown sugar, firmly packed
  • 2 tsp. vanilla extract
  • 2 1/2 c. shredded zucchini
  • 2 chocolate bars, chopped, OR 1 c. chocolate chips

  1. Prepare two loaf pans, and preheat oven to 325°F/163°C
  2. In a medium sized bowl, sift together the first six ingredients, seven if you’re going to use flax.
  3. Once you have your dry ingredients combined, in a separate bowl, cream together your oil, sugar and vanilla and applesauce (and the eggs, if you’re using them). Fold in the zucchini, and the chocolate chips. Add your dry ingredients to your wet, making sure to scrape the bottom of the bowl to make sure that everything is thoroughly combined — it’s just so much more work to do this step the wrong way around, and if you overstir your bread, more gluten will form than you might want, making it less muffin-crumbly, and more firm, so be aware of that!
  4. Divide your batter evenly into your two oiled pans, and bake for an hour on your lowest rack. Do the toothpick test fifty-five minutes in, to make sure you’re on the right track.

There is every chance that your bread won’t be this crumbly; having to turn the loaves and otherwise fuss with this !#@$!*&%*&@# oven means that mine didn’t cook as evenly as it should have; the interior was more moist than it should have been while the edges were more dry. However, the results were whisked out of the house to the Arts Department; the secretary, who squirreled away the leftovers, remarked that I was indeed “a good woman.” Which is high praise indeed.

C is for Cookie (That’s Good Enough for Me)

Cookies are not generally my friend.

For one thing, they’re too small. They don’t require a commitment, like bread or cake does. You don’t have to slow down and think, or get out a knife and a plate. No. You pick those bad boys up, one in each hand, and usually one in your mouth, and, well, then, do you have the two cookies you said you could have? Or have you had one more? What are you mumbling with your mouth full? Stop chewing, darn it. This is your Conscience speaking.

Tsk. Cookies. Too small for their own good.

But sometimes, a girl’s just gotta have a cookie. Or, a biscuit, if you’re British. Although apparently cookies exist here, I just can’t figure out how come those cookies are cookies and they’re not biscuits. But then, if you’re Scottish, there are like six words for HILL, so don’t worry too much trying to figure out this one. Let’s get back to the point: COOKIES.

(I have to apologize for the craptastic nature of the first couple of pictures. We have ONE nice fancy camera, and then… my phone. I did my best, but because of the low lighting in the kitchen, these are fuzzy and make our house look like it’s back in the 70’s. Sorry.)

A friend sent me a box of chocolate bars from Portland, apparently secure in her sympathetic belief that there is no chocolate in Scotland. Actually, she was just worried that I hadn’t found any chocolate covered crystallized ginger here, and while it probably exists, I’m just as happy I don’t have to look anymore. Not only is this bar divided into tidy little squares, inside each wrapper is a love poem — in this one, the Bard’s famous 18th sonnet. Gotta love that. I decided to use these hot/sweet chocolate bars as my chocolate chips.

Fortunately, the Post Punk Kitchen Blog and I were on the same page. I used their same basic recipe, but as always, I couldn’t resist the tweaking. So, here’s mine:

Chocolate and Chipper

  • 1/2 brown sugar
  • 1/4 white sugar
  • 1/3 cup oil
  • 4 Tablespoons applesauce
  • 1/4 cup milk (I used unsweetened soy)
  • 1 tablespoon tapioca flour
  • 2 teaspoons pure vanilla extract
  • 1 1/2 cups whole wheat flour
  • 1/4 c. oatbran
  • 1 Tablespoon baking powder
  • 1/2 teaspoon salt
  • Two 3.2 ounce crystallized ginger chocolate bars, chopped, or 3/4 c. chips
  1. Preheat your oven to 350° and make sure your cookie sheets are ready to go,
  2. With a fork or a stick blender, blend together sugar and oil until it is thoroughly combined. Since my applesauce was chunky, I had to throw that in, too.
  3. I added the wet ingredients in order and then the dry, and by the time I got to the chocolate chunks, I had to sort of just fold them in. It’s a stiff dough.
  4. Using a tablespoon measuring spoon, make ping pong sized balls and flatten them on your cookie sheet. Mine were about an inch across.
  5. Bake each pan for 8-9 minutes, tops — chocolate chip cookies are always molten and then do their last baking on the sheet. Let them rest for five minutes before even attempting to move them!

This yielded two dozen cookies, plus the three tiny “taster” cookies I made.

Because of the dual sugars, these cookies are soft and will stay soft and yummy. You’ll note that I cut the amount of oil used in the original recipe; I prefer to rely on the sugars and applesauce to keep the moisture instead of the oil.

You’ll also note that these cookies do not even remotely resemble Tollhouse, or even the Post Punk cookies — and that’s because of the flour. The original recipe calls for AP, I had whole wheat, so that’s what I used. A simple substitution involves using oat, AP, or even white flour to make the cookies look a little less scary to the fiber-averse. (On the other hand fiber AND chocolate should be a win-win.)

If you don’t have tapioca, experiment with using a tablespoon of ground flaxseed. The tapioca flour is an egg substitute; I didn’t grow up using eggs in cookies very often, so I doubt a whole lot is needed to keep the cookies held together. Just — try making it without, and see what happens. If the first batch crumbles, you can always spoon the rest of the dough over sliced fruit and call it a crumble.

There was a tiny hitch in this project; I intended to simply bake a batch of cookies, eat one or three, and then set them free into the wider world. Unfortunately, D’s department put on a full sit-down luncheon the day I packed him off with the goods, so he triumphantly returned the cookies home, made a few statements which began with the word “Mine,” and retired happily to a dim corner.

Cookie Monster is in the house.

Cranberry Orange Marmalade

This recipe is about having 10 oranges just sitting around, and having a bag of cranberries (frozen), and thinking that it should be Autumn, rather than it really feeling like Winter. So, we made a marmalade of sorts.

Cranberry Orange Marmalade:

  • 10 Navel Oranges
  • 1 bag Cranberries
  • 1.5 Cups Sugar
  • 3 Tbsp Agar Flakes

  1. Using a vegetable peeler, peel the orange zest from your oranges.
  2. Snip, chop, or julienne the zest into little pieces.
  3. Slice away the pith of the oranges.
  4. Supreme your oranges, squeezing the juice from the membranes when you’re done (and adding that juice to the pot).
  5. Cook everything on the stove until your massive cauldron of canning liquid comes up to a boil (approximately 30 minutes).
  6. Can according to your canning instructions (sterilization, cleanliness, all that good stuff), leaving 1/2″ of “head space” using boiling water process canning method* for 30 minutes.
  7. Let them cool by themselves, and refrigerate any jar which hasn’t sealed.

*Note: if you would like a very loose syrupy sauce, go ahead and pressure can these. If you want things to turn out right, don’t let your paranoia get the better of you. Pressure canning destroys pectins, so it’s not your friend!

When we came to Scotland we left a lot of things behind – either sold, given away, or just plain thrown away. Of those things which stayed with us was The Canning Cauldron. To call this a pot, or a kettle … well, that’s just the understatement of the century! Notice that it’s on the handy double-burner and it dwarfs the range?

And why did we go to the trouble to fire this up, when all we needed to can was two small jars of marmalade? Well, firstly, because the larger jar was just this much too tall to be canned in anything else. And, secondly, because we’ve been without hot water or heat for several weeks, now (except that our shower is an electric shower). Hot showers just don’t do the trick, when what you really want is a hot bath!

The cauldron served to fill the bathtub with enough hot water for a decent bath – although next time we’ll have opened the bathroom door in advance, so that the room itself can come up to temperature!

Stopping by for Lunch


Boy, this has been a busy week.

It’s been aggravating, because there have been a lot of elements outside of our control — people bashing holes in the wall with a sledge hammer, people tromping through and discussing things in loud voices. It’s not exactly an atmosphere conducive to work or story — so it’s Friday, and we’re way behind on everything. It’s a day for just a quick, one-handed-and-keep-going-at-one’s-desk kind of lunch. With a little quick bit of prep, this is good for any day.

As a reprise of Veggie Meat, we did up two kinds of gluten this morning. Rather than forming them into individual links, we figured we could slice off chunks of sausage and be just as happy, and wouldn’t have to take the time to do all of that fiddly shaping. (We apologize that there aren’t pictures this time of the steps, but we just didn’t have time!)

Here again is the basic recipe:

  • 1.5 cups vital wheat gluten
  • 1/4 cup nutritional yeast
  • 2 tsp paprika
  • 1/4 tsp cinnamon or nutmeg
  • 1/4 tsp cumin
  • 1-2 tsp pepper
  • 1/4 tsp cayenne pepper
  • 2 Tbsp garlic or onion powder AND sage
  • 3/4 cups water or vegetable broth or tomato juice
  • 1 tbsp soy sauce
  • 2 tbsp oil

As you can see, there are two colors of sausage; when using the basic recipe, we simply added 8 tablespoons of butternut squash purée and used veggie broth for liquid for the lighter colored sausage; the other has 3/4 c. tomato juice as its liquid component, and 1/2 c. chopped cranberries. In future, we’ll try adding the cranberries to the one without the tomato; though it is delicious, it tastes more like Italian sausage and completely loses the piquant sweet-sour zing of the cranberries. They would pair well with the butternut, which is quite mild, and would be a good candidate for inclusion in beans or with other things which have not so strong of flavors. The Italian Greatness is rather spicier, too, as we, um, *slipped* when tossing in the garlic, and so things are a little intensely flavored… but ignoring the garlic breath, yum. We don’t quite know what that will be paired with, but we’ll let you know, if we can quit eating it just out of hand.

As we have no central heat, and are reliant upon a small space-heater, we’re baking as much as possible, much to the joy of everyone at work and in the Arts department at school. Banana bread is on the agenda again sometime this weekend, as is Kansas’ famous carrot cake jam — a recipe we’ve feared yet been dying to try for ages (Look: she posted it with the comment “look out hips.” This is NOT GOOD. Yet obviously awesomely good, and needing to be made immediately!) We’re obviously going to have to make time to see friends again, and soon, or else we’ll be staggering under the weight of baking. However, we’ll be warm, so that’s what counts!

Yes, that’s a cup of unsweetened, black coffee. That’s about 1/3 of the daily dosage, now that school has begun. Detox / withdrawal will begin around about Christmas Break.

Time for Fruitcake!

Yes, ladies and gents, it’s that time of year again. The weather has turned nasty (or, in our case, is continuing to be Glasgow weather) or will be doing so soon. We’ve begun to think about whether to give in to wearing gloves and scarves. We’ll probably hold off on that for another few weeks, but we couldn’t hold off on the annual production of the fruitcake.

This year we’ve done up a double recipe (based loosely on Alton’s Recipe) so that we can share with Scottish friends, my classmates, a coworker or two, and so that we’ll have at least one to take home for Christmas.

For alcohol, instead of rum, we macerated our fruit in 2 pints of pear cider, 2 cups red wine, and 2 cups vodka, and 1/4 cup of homemade vanilla extract.

Homemade Vanilla Extract:

  • 1 large bottle vodka, some missing
  • Vanilla pods, after you’ve scraped their guts out
  1. Put pod into vodka.
  2. Repeat as often as you have vanilla pods in the course of cooking.
  3. When it starts smelling of vanilla (even if it’s not strongly colored), use as you would vanilla extract.

Instead of the spices listed, we used our own Garam Masala, to the tune of about 2 tablespoons. Instead of using eggs, we used ground flaxseed (1 Tbsp = 1 egg, more or less), because it works just as well as a binder in baked goods, and this way we won’t have eggs sitting about at room temperature for the next 2+ months (and now this is a vegan recipe). We also left out the butter, in favor of a couple tablespoons of olive oil. It doesn’t really need as much fat as is called for, we’ve found. Truly. And we used almonds and sunflower seeds instead of walnuts (bleh!), and we used whatever dried fruit we had on hand. So, ok, it’s not Alton’s recipe, is it?

We ended up with 8 cups of macerated fruit (they sat for something like 3 days), plus whatever alcohol they hadn’t absorbed (about 2 cups). We topped up our liquid to 4 cups (more red wine & vodka), and were ready to throw everything together. All in all, this is a very easy cake to make.

After mixing everything together (without any boiling, as Alton suggests) it went into two 5×9 loaf pans plus 8 small, pyrex dishes. They baked at 350F (150C), more or less, for about an hour and a half. We then pulled them out to cool overnight, and baked them a second time (out of their pans) at 215F (100C) for another hour.

One was devoured sacrificed after the second bake, so that we’d know how everything turned out. They weren’t at all boozy, except in some of the larger chunks of fruit, so everything is well on its way.

So. Now, for the next few weeks, they’ll be liberally doused with fortified wine (Port is what we’d ordinarily use, but this year we’re going with a Shiraz/Cabernet/vodka mixture) every few days, until the bottle runs out. At that point we’ll let them sit out (beneath a kitchen towel) for several weeks, until the booze has all evaporated. By that time it should be near the holidays, and the cakes will be very short for this world, indeed!

Rosemary Pasta

OK, so, once again this is a post about a recipe which … well, was rather spontaneous. So there is no recipe in any exact sense (meaning that, aside from the amount of flour, everything is a guess). But … well, this is about as dead simple as you can get.

  • 1/2 cup fresh rosemary needles
  • 3 Tbsp extra virgin olive oil
  • 1/4 onion
  • 1.5 lbs (680 grams) Durum Wheat Semolina
  • some strong, all-purpose flour
  • 2 tsp salt
  • 2 Tbsp garlic powder (not garlic salt)
  • water
  1. Puree rosemary, olive oil, onion, and salt. This should be as fine a puree as you can get, because any little bits left over will give you problems in rolling out your pasta.
  2. Add all ingredients to a mixing bowl. Yes, “all” does include the unmeasured quantity of water. I’ll say to just take it slowly, adding water by half-cups until you get something like a workable dough which can be formed into a ball, but which is still quite soft and a bit sticky.
  3. Knead dough until you’re happy that everything is distributed evenly.
  4. Tuck into a cool corner of the kitchen to rest for an hour or so.
  5. Pull it out, knead it with your AP flour until the dough is quite firm. The rest was to be sure that the semolina was fully hydrated – it’s kind of grainy, and coarse, and needs the time to soak up all the water it’s going to.
  6. Divide into 8 even pieces.
  7. Roll each flat, and feed into your pasta roller, on its widest setting.
  8. Fold each piece over in thirds, feed through the roller again, and repeat the folding and feeding but in the other direction, so that each piece will have gone through the roller three times (and gotten a good kneading this way, as well).
  9. Decrease the thickness setting of your pasta roller (I go 2 numbers down at this step, but yours may be different – this one’s a Pasta Queen, given to us years ago – thanks L.!)
  10. When they come out, cut each piece in half, and hang them somewhere convenient (we use a wooden clothes drying rack) or, if you can’t hang them, dust them lightly with AP flour and be careful not to stack them too high, or they’ll stick.
  11. Keep decreasing, cutting the sheets down to size as needed, until you’re down as far as you’re happy with. We don’t go below 3, and even 3 is a bit thin for our liking.
  12. Hang them up somewhere to dry. They don’t have to dry all the way, but they must dry somewhat before you can cut them into noodles, or else you’re going to need to use a lot of flour on your board. You could sandwich them in between layers of parchment paper & pop them into the freezer, if you’re going to use them later in lasagna.
  13. You’re done!

Our sheets are now almost dry enough to tuck into a zip-top bag for storage. They’ll go into a lasagna in a few weeks or so. We did a single batch of noodles, with the noodle-cutting attachment, just by way of testing to see that everything would taste right. 🙂