Rhubarbarama 2


Well, the Rhubarb Tartlettes only used up about half of the rhubarb jam. So, in keeping with the theme (of feeding my department), I decided to be a little unorthodox and mix up a sweet yeast bread … using our Sourdough starter. The starter needs to get a bit of a workout, as we’re traveling most of June, and it will be languishing in the fridge. Legend has it that it should be OK in the fridge for a month … but we may find that we have to start over, and that would be OK as well, considering that the process we used to get this one started only took about 3 days (pineapple juice: it’s the key to sourdough).


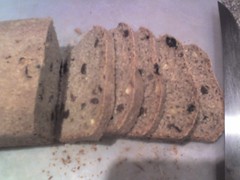
To my standard bread recipe I added 1/2 cup brown sugar and a couple tablespoons of olive oil (for moistness). Instead of letting it get a good, long fermentation going, I sped up the process by skipping a rise and prepping it with only a single yeast-backed rise (I usually supplement the sourdough with commercial yeast, because I’m lazy and live in a cold country where letting sourdough rise on its own can take days). I also left the dough quite moist. I flattened it out, filled it with rhubarb jam and orange marmalade (could have used a whole cup of rhubarb jam), rolled it up, tucked it into a springform pan, coated it with soy-milk, sprinkled it with sugar, and let it rise. After ‘slashing’ (I used scissors) I baked it on a lower than normal temperature, so that it’d have a chance to cook through while not developing too thick of a crust. After depanning, I sliced it into 16 wedges, and that was that! Quite a tender, moist, and flavorful loaf! It was really a bit more like a cake in texture, but it was thoroughly baked. It’s something I would repeat – perhaps with a sweeter jam than marmalade, and one with more character than rhubarb.

Tofu — Cheesecake

It’s one of the easiest recipes you’ll come across. Cheesecake can be quick and light as well as rich and satisfying. Despite the imperfection of the cracked surface this weekend (and the fact that we discovered too late that our lemon juice contained sodium metabisulfate, aka preservative E223, which is very harmful to T, so we left it out) our tasty cheesecake has always been a hit.

Created after some experimentation with a regular cheesecake recipe, it was originally intended to avoid the cloying richness of cream, and make a bit more virtuous a dessert. Never a fan of cheesecake anyway, I was especially surprised by the lightness and clean flavor of this one, and make it every time the occasion calls for something that looks fancy but is relatively simple. Even dyed-in-the-wool NY cheesecake eaters have been surprised at how good it is, and our non-vegetarian friends haven’t even known the difference between regular cheesecake and the vegan variety — so this truly is a winner of a recipe.

Quick Lemon Cheesecake

  • 1 14 oz pkg. firm silken tofu
  • 1 8 oz. pkg “Cream Cheese” Tofutti, or, substitute regular creamed cheese if you’d like
  • 2/3 c. sugar
  • 1/4 c. lemon juice (Modification: 1 c. other unsweeetened fruit conserve. We tried 1/4 c. blood orange juice – looks lovely but acidity isn’t enough to affect flavor)
  • 1/2 tsp. almond extract
  • 2 tbsp cornstarch + ice water

Though a graham cracker crust is traditional — a more flavorful alternative is a gingersnap crust! You can make it in the same way — whiz up ten or fifteen dry gingersnaps in your food processor (or ginger nuts, as they’re called here; just don’t confuse them with actual nuts…) and add a tablespoon of butter or margarine to create a crumb the texture of damp sand, and then pack it with your fingertips into the bottom of a spring form pan. Pre-baking the crust is unnecessary.

~ Preheat Oven 350 ~

Place silken tofu, cream cheese in bowl, and, using an immersion blender or beater, blend until smooth. Add lemon flavoring, either in juice or compote form.

In a smaller separate bowl, combine 2 tbsp ice water, almond extract and cornstarch with a whisk. Pour mixture into tofu blend and beat fiuuntil VERY smooth. Pour lemon filling into gingersnap crust, and bake for 45 minutes. Allow to cool for two hours, or for very best firmness, REFRIGERATE OVERNIGHT. (Of course, it’s also firm enough and edible warm, if you’re unable to wait. It’s just good any old way, but let’s pretend you have the patience to wait until it cools, okay?) Can be served with a citrus sauce for drizzling, mint leaves for garnish or edible flowers and grated chocolate. Or, it’s just good with a fork out of the pan, but again, please: let’s use some restraint, okay?


Cheesecake cracks.

It’s one of those things that just happens, but it makes it no less annoying that it happens to everyone when it happens to you. A couple of things that you can do to prevent this is to use a regular pie plate instead of a spring form. I rarely get cracks when using a regular pie plate, reason being, perhaps because the thinner spring form sides cool faster, allowing the edges of the cheesecake to shrink and pull. If you run a knife around the edge of the cheesecake before it’s 100% cool, post-baking cracks might be prevented.

Some people also swear by baking only on the bottom rack, not beating the mixture for more than two minutes (but this contains no eggs, so I’m thinking that doesn’t apply here), but mainly I think a cheesecake will crack when it’s over-baked. Using a water bath and baking it for no more than 45 minutes — then turning the oven off no matter if the middle is still wobbly — is the very best thing. The ambient heat will bake the center and the cheesecake will be just fine still in the oven. Allowing it to cool covered can also help.

And, if all else fails, you were going to cover that bit with grated chocolate and a little Devonshire Cream anyway.

A Tinge of Tangerine

Thank God for citrus flavors to punctuate a long, bland, starchy winter diet. A welcome break from root veggies are bright tasting tangerines, limes, lemons and Valencia oranges. We’ve been enjoying the delicate less acidic sweetness of blood oranges from Italy as well. Yum.

Citrus are the fruit of choice to perk up our salads, or use in sections or dressings for fresh lettuces or greens, as well as in our beverages (citrus peels in coffee gives, for instance, a lovely aroma) and now, we’re using the rest of our tangerines — the zest — in a quick dessert.

Quick Tangerine Sugar Cookies

  • zest of two tangerines, finely chopped
  • 2 c. All-purpose flour
  • 1 c. granulated sugar
  • 1/4 c. olive oil
  • 1 tsp. baking powder
  • 1/4 tsp. vanilla extract
  • 1/4 tsp. salt
  • 4 tbsp. water or orange juice as needed

Combine your ingredients to create a dough that is pliable; stiff enough to roll but not stiff enough to stand on its own, more a thick paste the consistency of gnocchi. On a cutting board, roll the dough into long tubes, using icing sugar to prevent too much sticking. Cut into lines into segments and roll the segments into balls.

Bake for 20 minutes on a sheet of parchment or silicone mat at about 350°F (175°C). Remove immediately from the parchment and place on a baking rack to cool and firm. Some people might choose to finish these with a citrus juice and powdered sugar icing, but it’s certainly not necessary – they pack a citrus-y punch all on their own. It’s the perfect quick cookie to make when friends drop in for tea and you have no flax seeds or eggs or milk on hand!

This quick and easy sugar cookie recipe will work beautifully with lemons as well, so if our Californian friends are being overburdened by their lemon trees, now is the perfect time to take advantage of this!

Speaking of ‘taking advantage,’ this was a fully experimental recipe we just cooked up because we were out of just about everything and the stores were closed. It turned out well, but we’re not done trying things. Next time we bake them, we’ll add almond flour, to give another layer of flavor and aroma to contrast with the slightly bitter peel, and maybe use a bit more juice to brighten it the citrus twist overall. Imagine these fragrant cookies cut out into shapes, studded with candied peel, or half-dipped in bittersweet orange chocolate…! Mmm.We can’t get enough of the tangerine flavor, but what do you do with your sugar cookies? Scent them with rose water? Garnish them with candied violets? Sugar cookies are a blank canvas and too many times, people make the mistake of leaving them plain, but they don’t have to be only blandly sweet. Use them as a palette to enjoy the scents and flavors of the coming spring. Cheers!

You Didn’t *Really* Think We Were Anything Else?

Oh, dear.

You didn’t really come here to see gooey chocolate recipes and things done up in pink paper and ribbons, did you?

Sorry. Wrong blog. Death By Chocolate is over at Pille’s. We’re the practical sort over here. We have trouble remembering each other’s birthdays, not to mention a made-up holiday that is meant to express love via Hallmark.

But enough of our sour grapes! We had some really, REALLY good sourdough today! There’s nothing like a sourdough starter in a city full of distilleries to make you happy any day of the month. Sadie’s one happy bunch of bacteria/yeast.

Anyway, even if you do like candy hearts that aren’t black, we still like you.

Sourdough Pizza


We’ve finally broken down & gotten a sourdough starter going. I couldn’t resist it when a former coworker forwarded the following directions to me:

  1. Mix 3 1/2 Tbsp whole wheat flour with 1/4 cup unsweetened pineapple juice. Cover and set aside for 48 hours at room temperature. Stir vigorously 2-3x/day. (“Unsweetened” in this case simply means no extra sugar added).
  2. Add to the above 2 Tbsp whole wheat flour and 2 Tbsp pineapple juice. Cover and set aside for a day or two. Stir vigorously 2-3x/day. You should see some activity of fermentation within 48 hours. If you don’t, you may want to toss this and start over.
  3. Add to the above 5 1/4 Tbsp whole wheat flour and 3 Tbsp purified water. Cover and set aside for 24 hours.
  4. Add 1/2 cup whole wheat flour and 1/4 or less purified water. You should have a very healthy sourdough starter by now.


We actually got a full-blown, crazily active starter within about three days!

We’ve named her ‘Sadie,’ and this pizza is her first try at giving us some true bread. We could’ve done something more … well, bread-like. But we were in the mood for a savory, whole-wheat pizza dough, so this pizza, with its fresh mushrooms, sweet red bell peppers, onions, Quorn sausage and cheese it is (or was, rather, there’s only the tiniest bit left to go with our salads for dinner). The crust is lightly sour and chewy and very tasty. As soon as Sadie grows up a little more, we’ll try out a crisp-and-chewy sourdough boule. Stay tuned!

Onion Caper Bread

The continuing saga of baking in the UK continues. This week’s episode includes trying once again to bake French-style loaves upon the pizza stone … with the result that the stone has been retired until such time as we have a better oven. Past experiments with the stone have included preheating the oven for an hour, to see if the stone would get hot enough. That didn’t work. This time I moved the stone up in the oven, and it still wouldn’t get hot enough to brown the bottom of the loaves. The next option would be to move the stone all the way up under the broiler, get it good and hot, and then somehow relocate the stone to a lower shelf.

We’re just going to have to learn to live without bread baked on a stone, because shifting a hot stone about just isn’t in the cards. My knuckles are already burned quite severely, just from trying to squeeze four loaves into such a tiny oven – I’m giving up the idea of moving that stone as a bad idea. (As to how severely, well, they blistered up & scabbed nicely, and I look like I’ve been brawling or something, which is enough to put me off the idea of getting them burned any further).

The loaves, as expected with a cool stone, didn’t have a crusty bottom, nor did they get much lift. So, we sliced them on the bias, and enjoyed them anyway … or, at least, we enjoyed a couple of them – one went to a fellow Bay Area native who’s also over here doing his Master’s degree, and another went to a professor.

As to what’s in them, they’re the standard bread recipe, basically, but with steamed whole oats, oat bran, flax seeds, a chopped onion, a couple tablespoons of capers (soaked to remove the salt), some yellow and brown mustard seeds, some cumin, and some sage. Because of adding the steamed oats you need to bump up the salt a little bit, but other than that it’s just a straightforward matter of “throwing stuff in.”

Once again, no problem at all with UK flour: if I can get bread to raise with an added 1/2 cup of oat bran in each loaf, plus all the other stuff, there’s certainly enough gluten in the flour!

Next up will be to finally get a sourdough starter going. I just read an article on the microbiology of yeast fermentation, talking specifically about getting wild yeasts going, and some of what was in there we’re going to try. The gist of this 17 page article was to the effect that the initial pH of the sourdough starter is not acid enough. They suggest adding 6 oz of pineapple juice to the starter on the first day, with that being enough of a jolt of acid to get the starter producing yeast on the first day. Otherwise you have to wait for some nasty bacteria to get going in there, and then to die, so that after three or four days you’ll have enough of an acid environment for the yeast to get going. The instructions can be found at Breadtopia, and the microbiologist’s name is Debra Wink – Breadtopia will send you the article if you’re interested.

Not having any pH strips handy we’re going to just wing it & see what happens. It may not take place immediately – we have to track down pineapple juice – but we’ll let you know when it does.

The other (less preferable) method would be to include apple juice for the first few days, which we could do … and we actually have the apple juice … but it’s nice, fresh-pressed Braeburn juice, and I like to drink the stuff. Sigh. The things we sacrifice for our art. Maybe. Just … maybe.

Mango Soufflé / Custard

This one could be said to be a bit on the exotic side, drawing, as it does, from any number of cultures, but actually the recipe just came out of thinking, “what would go well with this?” We had two mangoes, you see, which had been sitting around, glaring at us … and, well, they “needed eating up.”*

Mango Soufflé / Custard

  • 2 mangoes
  • 1 block silken tofu
  • 3 Tbsp coconut cream
  • 1 Vanilla bean
  • Cardamom
  • Cinnamon
  • Nutmeg
  • 1 Lemon zest
  • 1 Lemon juice
  • 2 Tbsp Rose water
  • 3 Tbsp tapioca starch
  • 1/4 cup sugar (to taste)
  1. Blend everything except sugar and tapioca starch.
  2. Taste it. Add sugar if it needs it; omit if it doesn’t.
  3. Blend tapioca starch into mixture.
  4. Pour into ramekins.
  5. Bake at 350°F / 175°C for 25 minutes or until center is just set.

The entertaining thing about “until center is just set” with this particular dish is that … well, it’s not gonna set, probably until you pull it from the oven and let it sit for a while. What it’s going to do, unless you had the sense to put these in a water bath, is to turn bubbly around the edges & form a skin on top. Now, for us, this isn’t a problem. For you? Well, solve it by starting out with a water bath, or finish it by maybe putting on a sprinkling of sugar & caramelizing it with a torch.

Flavorwise, the reason to hold the sugar & the tapioca starch is to see how sweet it’s going to be. We didn’t want to overwhelm the flavor by making it too sweet, so by holding the sugar & starch, you can taste it & get a good idea of the sweetness of your fruit. If you put the starch in sooner, then you’re going to have a sample with a rather chalky taste … which isn’t terribly bad, but isn’t as easy to determine flavor as it could be.

This is also a very forgiving dish because of one thing: it doesn’t use eggs. You can’t overcoagulate the proteins in this because … well, they’re pre-coagulated in the form of silken tofu. The binder here is the tapioca starch, which holds up to heat very well. So, if you feel like it, cook it as long as you want, or as little as you want – it’ll only gel so far, and that all depends on the amount of starch you added. If you want it to be firmer, then you’ll have to do up another batch. If you experiment with using cornstarch (or corn flour as it’s called here), let us know how it turned out.

* Full quote: “She’d announce at lunch, ‘We must have the pork tonight, it needs eating up.’ Vimes never had an actual problem with this, because he’d been raised to eat what was put in front of him, and do it quickly, too, before someone else snatched it away. He was just puzzled at the suggestion that he was there to do the food a favor.” Terry Pratchett, Thud, p 287

It’s about YEAST!

OK, I’ve been absent a bit from the blog, what with all of the holidays & with essays to write & all manner of things. Don’t let that fool you into thinking that I haven’t been baking, though! As a matter of fact, I finally figured out what’s been going wrong with baking bread in the UK: YEAST! Yes, ladies and gentlemen, it’s not about the flour or the water, but about the yeast. I finally finished off my Scotland-purchased yeast and broke into my stash of yeast shipped from California … and my bread turned out right!

I could tell, from smelling the yeast proofing, that it was going to be a good set of loaves. They were just plain old bread (well, OK, they had oat bran & flax seeds in them, but that’s “plain” for us), but they turned out marvelously! They went through multiple rises just fine, with the yeast having enough guts to actually go through a second rise, and they turned out bread that we oooh’d and aaaah’d over, immediately recognizing as “bread” rather than … well, something so not bread as to be something we’ll never do again. They kneaded well, they formed gluten fairly quickly, and they were … well, right.

Hear this, friends from the States: admission to this flat will henceforth be 1 industrial-sized ‘brick’ of Red Star Yeast. We don’t care if the customs people look at you like you’re crazy: tell them you’ve crazy friends on the other side.

Because it’s not about the flour or the water, but about having good yeast!

Christmas Teacakes


OK, really quickly, here’re two recipes. The first is standard ginger teacakes, the second is a parsnip version of those same teacakes. Yes – parsnip cookies. When you live in the UK, and you’ve subscribed to an organic vegetable cooperative, you end up with these things … in bulk! What the heck do you do with parsnips?! Particularly if you’ve only ever seen them once before! Well, cookies, of course!

Ginger Teacakes

  • Flour
  • 2 Tbsp baking powder
  • 1/2 tsp ground Cinnamon
  • 1 Tbsp ground Ginger
  • 1/4 tsp ground Cloves
  • 1 small “arm” Star Anise (optional)
  • 1 Cup brown sugar
  • 1/2 cup apple sauce
  • 1/4 cup olive oil
  • 1/4 cup molasses
  • 1/2 cup crystallized ginger, chopped
  • 1/4 cup flax seeds, ground (linseeds)
  • Granulated sugar, for rolling
  1. Combine everything except for the flour (well, and also leave out the granulated sugar that’s for rolling, of course).
  2. Gradually work in enough flour to make a very stiff dough. We used strong, wholemeal flour, but you could wimp out and use something light-colored.
  3. Form into 1 inch balls, roll in sugar, and place upon parchment paper, with about 1.5 inches in between each cookie.
  4. Bake at 300F / 150C for around 12 minutes.
  5. Allow to cool completely before removing from parchment.

So, that’s the Gingerbread version. They turned out wonderfully, all light & fluffy inside. We used whole, dessicated ginger for our powder (you can find them at SFHerb.com, item # 87 or 687). This kind of ginger is much better than just plain old ginger powder, as it’s much hotter & more potent. We made two batches, one with the Star Anise & one without (because some of us don’t like the flavor it takes over the flavor of the cookies, and pretty soon it’s like you didn’t have any other spices in there). One note: be sure to use a mildly flavored honey, as somehow the flavor comes through (yes – experience speaking, here – we tried to use up some really strong honey, and can taste it in the end product).

Parsnip Teacakes

  • 4 cups steamed parsnips (without the bitter core)
  • Guts of 1 Vanilla Bean
  • 1/4 of a nutmeg nut, microplaned
  • 3 Tbsp coriander seeds, ground & sifted
  • Zest of 1 lemon
  • 3/4 cup flax Seed, ground (linseeds)
  • 1/2 cup granulated sugar
  • 1/4 cup xylitol (can substitute granulated sugar)
  • 1/2 cup honey
  • 1/4 cup agave nectar (can substitute honey or corn syrup)
  • 1/4 tsp salt
  • 4 Tbsp baking powder
  • 5 cups flour
  1. Mix everything except the flour and baking powder.
  2. Let stand for 15 minutes, to allow the flax seeds to hydrate.
  3. Mix in baking powder.
  4. Mix in most of your flour, reserving some in case you don’t need it.
  5. Once you’ve got a really arm-breakingly stiff dough, let rest for 5 minutes or so, to let the flour hydrate & let the dough relax.
  6. Form into 1 inch balls, roll in sugar, and place upon parchment paper, with about 1.5 inches in between each cookie.
  7. Bake at 300F / 150C for around 12 minutes.
  8. Allow to cool completely before removing from parchment.


These could’ve been a bread, maybe, except that they’re way too tender for that. We concluded that they might have wanted to be muffins, really, because they are so incredibly tender. We’ll have to see what happens when they finish settling, but we’re certain that they won’t turn out to be “snaps” by any means, since they have the different sugars in them to keep them tender, and the honey to pull moisture from the air (fun stuff, food science).

They could have taken way more spices than we added, because the flavor of parsnips really overwhelms anything we threw at them. They could have used maybe the zest of 4 lemons instead of just 1, and, strangely enough, they smell & taste like they really would pair well with coconut – so the next try at these will probably involve the use of coconut milk powder (again, found at SFHerb.com, item 251).

The parsnip teacakes are heading off to our neighbors and our local health-care professionals (the ladies at the pharmacy and the doctor & nurse at our local surgery). There’s really no way we can leave these sitting about in our house, lest we eat them all up (as happened to the first batch of ginger teacakes).

Now, what could we make out of these silly swedes…?

Stollen


With many thanks to the inspiration of Claudia’s recipe and Karen’s recipe, I present to you our own unique take on stollen. We didn’t ice it this year, nor cover it with powdered sugar, but it’s certainly stollen.

I’ll present the recipe, as it is … but I’ll trust that you already know how to make bread, because you’ll need to use your own judgment about quantities of flour. Also, keep in mind that this is supposed to be a bit on the bitter side, in a way: in other words, it doesn’t contain dried blueberries (as I’d initially wanted).

Stollen

  • 4 cups warm water
  • 1.5 Tbsp dry yeast
  • 1 tsp salt
  • 1/4 cup sugar
  • 1/2 cup candied citron
  • 1/2 cup glaceed cherries
  • 1/2 cup raisins or dried currants
  • 1/2 cup dried apricots, diced
  • 1 cup almond meal (blanched & ground almonds)
  • 1/2 cup oat bran (optional, I suppose)
  • Strong, wholemeal wheat flour
  1. Proof your yeast, along with the sugar.
  2. In a large bowl, mix in all the rest of the ingredients except the flour.
  3. Mix in enough flour to give yourself a good, kneadable dough.
  4. Knead until your dough has the appropriate texture – it will be somewhat grainy, and won’t form “windowpanes” because of the almond meal, but it will still be somewhat smooth & elastic.
  5. Shape into 4 small loaves, place into loaf pans, and let rise until more than doubled in size.
  6. Bake.

Of course, you’re free to apply icing, or powdered sugar, or whatever … for us, we’ve just been eating it without any of the extras. We’re going to try to track down our neighbors again, to gift them with a loaf … but, well, you know how it is: living in a “convenience” flat means that you never can tell when your neighbors are home. We’ll see – they may have to wait for the next batch.