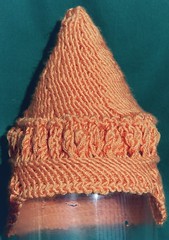
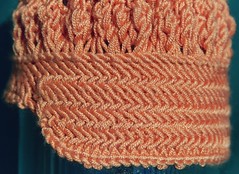
Shown here is my latest creation. Turned knit side out, it seems to want to
resemble something Mongolian. Turned purl side out, it seems to resemble
something Andean. This is perhaps not as clear in these pictures because of
the glass jar upon which it’s settled (and yes, there’s fog in there ’cause
I’d just washed it and because it was miserably cold out on the deck).
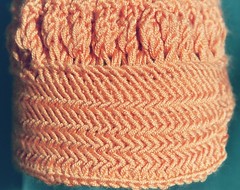
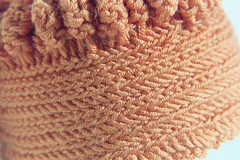
This is more playing around with the Herringbone stitch. Herringbone is
comprised of knitting through the back loop of two stitches but only dropping
one of the stitches off of the needle. Thus, every stitch gets knitted twice,
but you don’t end up adding stitches. The final stitch in a row (if you’re not
knitting in the round) is then knit as a single stitch. For purl, you’re
simply purling two stitches together and dropping one stitch off the needle.
Thus, you end up with herringbone only if you’re actually knitting and
purling; otherwise you end up with a sort of elongated stitch, and a firm,
thick, almost woven feel.
 |
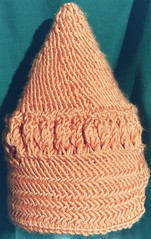 |
| Knit side, side view. | Knit side, from the back. |
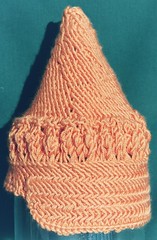
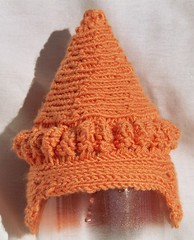
The pattern I ended up with is below. However, you’ll notice that I didn’t
follow this pattern; rather, I wrote down what I did and have altered the
pattern below to make up for what I view as mistakes. Mostly, the piece to the
left deviates from the pattern only in the last 5 rows or so, as you can see
by the gaps left around the transition area of the base. I was kind of feeling
my way through, and … well, didn’t really like where it ended up as much as
I could have. So, I deviated right around step 28, and I didn’t continue with
as many rows as I write in the pattern, but … well, next time I’ll try to
follow it. Like I follow all recipes, I guess. Sigh.
 |
 |
| Knit side, closeup of the band. | Knit side, showing transition in the band. |
Abbreviations:
- Asterisk (*). Repeat between until you’ve gotten to the end of the
row.- H – Herringbone Knit (see above)
- HP – Herringbone Purl (again, above)
- RYO – Reverse Yarn Over. Don’t just throw a loop over your needle, but
twist it; it works better, I think, and is the way I’ve done things.- KFB – Knit through the front loop but don’t drop the stitch off the
needle. Knit through the back loop of the same stitch, then dropping the
stitch off the needle. This results in an added stitch, but one which is
attached, unlike the Yarn Over.- K2TOG – Knit two stitches together.
- S – Slip a stitch from left to right needle without knitting it.
Pattern:
- Cast on 5 sts using double-pointed needles. (Switch from dpn’s to
circular when you get enough stitches to be happy about it).- *H1, RYO*
- H10
- *H1, RYO*
- H20
- *H2, RYO*
- H30
- *H3, RYO*
- H40
- *H4, RYO*
- H50
- *H10, RYO*
- H55
- *H11, RYO*
- H60
- *H12, RYO*
- H65
- *H13, RYO*
- H70
- P70
- *K2, KFB2* (=105 sts)
- *K2, KFB4* (=175 sts)
- *KFB* (=350 sts)
- *K2TOG* (=175 sts)
- *K2TOG* , K1 (=86 sts)
- P86
- H86
- H86
- H86
- Bind Off 30 sts
- S1, K1, *HP52*, K2
- S1, K1, *H52*, K2
- S1, K1, *HP52*, K2
- S1, K1, *H52*, K2
- S1, K1, *HP52*, K2
- S1, K1, *H52*, K2
- Bind Off
 |
 |
| Purl side, front | Purl side, back |
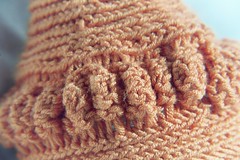 |
 |
| Purl side, bobbles. | |
 |
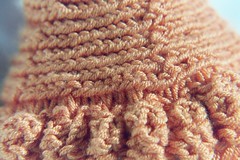 |
| Purl side, closeup of the band. | Purl side, closeup of the top. |
I do believe that I may attempt to follow my own pattern and re-knit this one (perhaps for an article somewhere?). Orange definitely suits it, and the yarn (some cheap microfiber stuff), while not particularly easy to work with, is stiff enough and smooth enough to show the pattern nicely. Of course, it’s also unfriendly enough to show where I did the RYO’s, so I’m wondering if maybe I should find a better way of increasing for Herringbone. Maybe knit through one stitch, don’t drop it, and then knit through two stitches to make the herringbone as usual? Don’t know. It’s a hard one, because herringbone shows the stitches so clearly.
The other thing about herringbone is that the increase I was doing ended up being steeper than I’d expected, had I been doing plain knit stitches. In other words, to get that same steep point in knit I’d expect to do probably half as many increases. Strange.
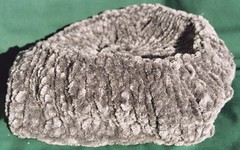
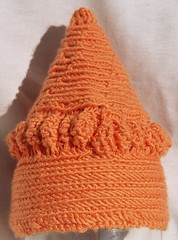
This guy? This is the side view of a hat, done up in Lion Brand Chenille. I
think this was like my third hat ever, and it was my first experiment in
knitting something both round and flat. It’s also my first experiment
with cabling, even though it’s a simple 1 stitch cable.

Here’s a better view of the top. Needless to say, I wasn’t terribly creative
about closing up the whole in the top, and I believe I probably cast on way
too many stitches for the first row. I’m told, however, that the whole lets
out heat … yeah, okay. But it’s fuzzy and comfy, and it works.

This work is licensed under a
Creative Commons Attribution-Noncommercial-No Derivative Works 3.0 License.
the herringbone stitch looks very interesting…next on my list of stitches to learn
your hats are amazing! truly! i get inspired by your variety.
and thanks for your kind words and suggestions regarding my surgery. i appreciate them.
and also the sari ribbon. have kept my eye open for a pattern along those lines. interweave has one but i am unsure of the yardage needed. and now the LYS is out of that color ribbon so i will need to be creative! take care.
I think I’m following Diane around on the blog reading….I, too, like the herringbone stitch. Quite an interesting texture! Would be good to see the hat on human model to get a better flavour for the whole Andean/Mongolian effect….