Yellow Hat, Redux

Yellow.2.Knit.Side.2
More in the series: wishiwerebaking.

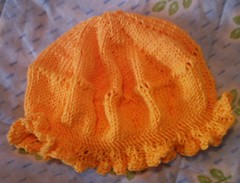
Another yellow hat. The first one was just right, except that I made the band too tight for an adult to wear, so I had to redo it … because, yes, this is for an adult. See the fringe? We wonder at her sanity.

The variation in this one was that I added a lace inset – just a simple “take the yarn around the needle twice” for a whole row. That made the break for where the “side” of the hat is, even though I continued to increase for another 4 rows or so, and then decreased the same number, so that there’re actually 10 little points along the side.

The fringe was done by knitting 2×2 rib, then by knitting through the front & back for the knit stitches, and just purling the purls, for two rows. This meant that each 2-stitch wide knit section turned into 8 stitches, while the purls remained 2 stitches wide. This worked out well, as now the fringe doesn’t want to curl inward when the hat’s worn with the knit side out. It gives some shape to the fringe, keeping it away from the face & head.

Apologies for the blurriness in these pictures – they were taken with my cheapy digital camera – a VuPoint something-or-other. Cost $40, and I’m getting what I paid for.

I really must follow TeaAndCakes‘ advice and get a Fuji Finepix F10. Some day. When the remodel’s done with.

Scattered Thoughts

Today I happened across The Home of Mathematical Knitting. Quite a fascinating site, really, if a bit … well, off-beat as far as the types of things I’d ordinarily see myself knitting. Interesting, though. More along my lines of interest (for immediate use) is the article over on Fleegle’s Blog on Charting Knit Patterns with Excel. Links there for downloading fonts for use in making patterns & all sorts of other goodies.

Also, I’ve been directed to go over to the Post Punk Kitchen, to check out “Vegetarian cooking & vegan baking with no attitude.” What’s the point if you can’t get all righteous about it, I ask? We’ll see. There’s a cook-book associated with the site, and there’re recipes there, of course. I’m actually glad that there’s not the attitude, as that’s what usually keeps me away from identifying as a vegetarian / almost-vegan … the attitude towards that “almost” is truly difficult to bear.

I was pointed to a cool online cartoon site called Married To The Sea. I must point the way towards two cartoons: I Hate Voting, and Keep Going.

There. Now that the scattered thoughts are out of my head and into the hive-mind, I can get back to the grind … after grinding some coffee, that is.

Kabocha Pasta

kabocha_pasta1
kabocha_pasta1
More in the series: wishiwerebaking.

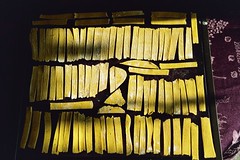
Our lovely CSA (Riverdog Farm) had given us Kabocha squash several weeks in a row, so we had to do something with it. This is one of the reasons why we belong to a CSA, and one of the recurring challenges with our weekly produce box. Every Wednesday we pick up the box of produce, not knowing what’s in it, and every week we try to use it all up. Or, well, give it away, if it’s something particularly wrong, like that absolutely disgusting Romanesque Broccoli.

In any event, we’ve got all of this squash. So, we baked it, pureed it, and turned it into noodles. Basically, take semolina flour, give it a spin in the food processor with the cutting blade and your herbs (fresh rosemary, onion maybe), and then add your squash. When things have come together into a somewhat moist ball, pull it out and refrigerate overnight. (The resting step doesn’t have to go overnight, but it hydrates the flour quite well, and will make the noodling process easier.) Divide the dough into manageable bits, roll out, run through your pasta roller if you’ve got one, or simply roll as thinly as you can, and cut with a pizza cutter. You’re done, there, but we went the extra step of laying them out for our food dehydrator & running them overnight, so that they’d store well.

Nice, toothsome, thick noodles. Relatives took them all.

To find more about CSA’s, check out KQED’s Blog Entry about them.

Candied Walnuts

walnut7
walnut7
More in the series: wishiwerebaking.

Nuts are supposed to be good for you and all … and I suppose they don’t lose any of their virtue if they’re candied, right?

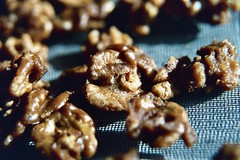
A friend gave us a large bag of walnuts, saying that they didn’t know what to do with them. So, we took them home and did some thinking. We thought that if we were to candy them then we’d be able to share. Yes. That’s what we thought. They never made it out of the house.

The “recipe” for candied walnuts isn’t really all that deep. The one thing which made the real difference in flavor? That’d be having blanched the walnuts in boiling water first, to remove the tannins from the skin of the meat. It turned the water a nasty brownish color, and the walnuts ended up quite pale in color. From there, it was a matter of letting them dry & mixing up some caramel.

For the caramel, we added some molasses (1/4 cup), sugar (2 cups), water (1/8 cup), and spices (cayenne pepper, cinnamon, nutmeg, allspice, cloves, salt) to a pot and let it go until it was well above the Hard Ball stage, to 265 degrees Fahrenheit. Take it off the heat at this point and carefully add in about 1 tsp vanilla extract. Then just dump the sugar over the nuts in a large bowl, mix until coated, dump out on parchment, and wait. After a couple of hours the caramel will have sugared out a bit, leaving you with something almost the consistency of maple sugar coating the nuts.

Cayenne pepper makes them quite addictive. Don’t leave it out, and don’t be chicken about it, either. We think that it’s what kept these from being gifts … and we’re glad that we don’t get walnuts all that often!

Blue Felted Hat

blue_felt4
blue_felt4
More in the series: wishiwerebaking.

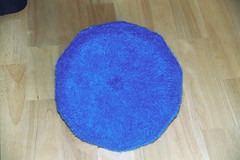
This is the first experiment in felting. It’s about 10 inches across, and I’ve blocked it to retain the points that came from doing regular increases (e.g., every 10 sts, knit a row, then every 11 sts, etc.). I’ve yet to finish it, ’cause I need to take it to the craft shop and find some nice satin ribbon or something to trim it out with.

It’s actually way fuzzier than I expected, and you can still see the stitches underneath. I don’t know if it’s supposed to go this way, but … oh well. I tried brushing it while wet, scrubbing it against itself, and all manner of things until my hands were rather raw. What worked best was just throwing it in the washer on hot & letting it go.

Sometimes you just don’t know…

You think you know somebody, and then something so odd, so strange, just leaps up at you, and you wonder. You wonder, “how is it that I never knew that about you?” Just now, I’ve been sitting here with TadMack as she’s finishing up a story, before we go out to look at more kitchen things (granite countertops, today), and she needed to write the word “über.” With the umlaut. Now, for me to write that? I’d have to pull up the character map (charmap.exe – you’ve got it if you’ve got Windows). For her? She holds down the Alt key and uses the number keypad to type 0252. Without looking. Without even thinking about it. Try it: press Alt+0252. You get:

ü

I’ll bet she knows all of the accented French ones, too, and probably the Spanish one (ñ). After all, how many times do you need the ü character, as opposed to the é or the ñ characters?

Photo Stream

Just a quick post to say that we’ve finally given in to the digital world. Yes, folks, we’ve got a Flickr account. I must say that I’ve been very leery of putting anything really out there in the world of the interweb. But, alas, leaving the pics up on my ISP and paying for them to host them is kind of painful, too. The upside there was that nobody could say they owned them … but I’m guessing that they won’t be terribly jazzed and want to steal them from Flickr either.

Or maybe they will, in which case, more power to them, I suppose. Paranoia takes energy to maintain … and having people be able to see my pictures is far better than being all paranoid. So. Pics are up there for people to see … and if you contact us we’ll add you to our list of Flickr contacts so that you can see ones with people in them. That’s got to be the one concession to paranoia: we’re letting anything with people in them be public. So there.

Now to hours and hours and hours of uploading and organizing all the pictures from the past years and years and years….

Let the Chaos Begin

This afternoon begins the actual, real-life, this-isn’t-going-to-go-away portion of our program. Yes, now that the taxes have been done (and paid – ouch), we’re finally going to begin tearing apart our little home. This afternoon we’re off with the builders to buy cabinets, so that sometime next week our kitchen can be demolished.

On the plus side, this means that we’re finally getting rid of the 1970’s era microwave. On the negative side … this means that we have to buy a new one. Also on the plus side, we’ll end up with some way better storage down in the garage, because we’re having the builder install the old cabinets down there. That way we can store canned goods downstairs instead of taking up precious space in the pantry; hey – try storing 100 quarts of anything & you’ll see what I mean.

So. First comes the kitchen demolition, then installation of the new cabinetry, then removal of a wall & part of a coat closet so that we can add kitchen cabinets on one side and simply have less storage for coats (who, in California, needs that much storage for coats?). After that’s all done comes removal of a strange little pantry (so that we can have more light and more dining room space), after which comes carpet removal and wood floor installation (bamboo, thank you). After all that comes the upstairs bathroom.

So, the schedule looks like this:

  1. Kitchen Cabinet Removal
  2. Kitchen Cabinet Installation
  3. Coat Closet split into more Kitchen Storage & a smaller Closet
  4. Pantry removal
  5. First-floor bathroom renovation
  6. Carpet Removal
  7. Bamboo Floor Installation
  8. Upstairs bathroom renovation
  9. New hvac installation

And somewhere in there we’ll be painting things as well. It looks like this project’s going to involve our house being torn up for at least a month, and probably more like two. The builders seem to think that it’ll only take them one. I laugh. Truly.

I’ll be taking pictures of it all, I’m sure. After checking out TeaAndCakes’ photostream on Flickr, I’m thinking that I need to get a decent digital camera. Perhaps after all the building would be best … but I’d like to have pictures of it all, too. Film may just have to suffice. And, besides, I really do like my camera.

Semantics Is Important

semantic: adjective relating to meaning in language or logic. From French sémantique, from Greek semantikos ‘significant’.

semantics: plural noun [usually treated as singular]. 1) The branch of linguistics and logic concerned with meaning. 2) The meaning of a word, phrase, sentence, or text.

Late last night, slumped against a pile of pillows knitting, I had a realization. I realized that the world would be a better place if the names of things were actually descriptive of what they do. To what am I referring? I am referring, of course, to “point protectors.” I realized that they were misnamed only after I had invented the silly things again.

You see, I am working on a new hat, and have decreased to do the band, so I’m back on to double-pointed needles instead of working on a circular. This means that I’m juggling four or five needles, a ball of yarn, an almost-fully-knit hat, and the television remotes. So, scrambling to find the remote while not losing my knitting, I began to think. I thought all through the commercial, and well through the next segment of the show (something about volcanoes or global warming or Mars or something).

At the next commercial, I carefully set aside the knitting and went out onto the back deck, to retrieve the left, pinkish-purplish flip-flop which resides there. I retrieved the left one because my left foot’s smaller than the right (one of yours is, too, you know), so I figured it could lose a half-inch or so and not have any effect. I proceeded to pare away 1/2 an inch and to cut it into cubes, each of which I skewered so that I’d have a place into which to place my points, and voila! I no longer ran the risk of my work slipping off of the needles!

At which point I realized that the things called “point protectors” are probably not designed to protect the points of your needles. No. They’re probably designed to keep your work from slipping off of the needles. So WHY are they named “point protectors?” I had passed the things up many times, simply because I thought to myself, seeing them, “why do I care about protecting the points of my needles? And I’m perfectly safe from the points, so why do I need to protect myself from the points? After reading Isobel’s blog, I’ll be careful, so I don’t need those.”

Bah, I say. Semantics! Name the things “yarn keepers” or something!

And then, this morning, I find that I’ve been holding my knitting incorrectly and am knitting everything (well, everything round, anyway) backwards.

Hats – New and Old

Shown here is my latest creation. Turned knit side out, it seems to want to
resemble something Mongolian. Turned purl side out, it seems to resemble
something Andean. This is perhaps not as clear in these pictures because of
the glass jar upon which it’s settled (and yes, there’s fog in there ’cause
I’d just washed it and because it was miserably cold out on the deck).

This is more playing around with the Herringbone stitch. Herringbone is
comprised of knitting through the back loop of two stitches but only dropping
one of the stitches off of the needle. Thus, every stitch gets knitted twice,
but you don’t end up adding stitches. The final stitch in a row (if you’re not
knitting in the round) is then knit as a single stitch. For purl, you’re
simply purling two stitches together and dropping one stitch off the needle.
Thus, you end up with herringbone only if you’re actually knitting and
purling; otherwise you end up with a sort of elongated stitch, and a firm,
thick, almost woven feel.

Knit side, side view. Knit side, from the back.

The pattern I ended up with is below. However, you’ll notice that I didn’t
follow this pattern; rather, I wrote down what I did and have altered the
pattern below to make up for what I view as mistakes. Mostly, the piece to the
left deviates from the pattern only in the last 5 rows or so, as you can see
by the gaps left around the transition area of the base. I was kind of feeling
my way through, and … well, didn’t really like where it ended up as much as
I could have. So, I deviated right around step 28, and I didn’t continue with
as many rows as I write in the pattern, but … well, next time I’ll try to
follow it. Like I follow all recipes, I guess. Sigh.

Knit side, closeup of the band. Knit side, showing transition in the band.

Abbreviations:

  • Asterisk (*). Repeat between until you’ve gotten to the end of the
    row.
  • H – Herringbone Knit (see above)
  • HP – Herringbone Purl (again, above)
  • RYO – Reverse Yarn Over. Don’t just throw a loop over your needle, but
    twist it; it works better, I think, and is the way I’ve done things.
  • KFB – Knit through the front loop but don’t drop the stitch off the
    needle. Knit through the back loop of the same stitch, then dropping the
    stitch off the needle. This results in an added stitch, but one which is
    attached, unlike the Yarn Over.
  • K2TOG – Knit two stitches together.
  • S – Slip a stitch from left to right needle without knitting it.

Pattern:

  1. Cast on 5 sts using double-pointed needles. (Switch from dpn’s to
    circular when you get enough stitches to be happy about it).
  2. *H1, RYO*
  3. H10
  4. *H1, RYO*
  5. H20
  6. *H2, RYO*
  7. H30
  8. *H3, RYO*
  9. H40
  10. *H4, RYO*
  11. H50
  12. *H10, RYO*
  13. H55
  14. *H11, RYO*
  15. H60
  16. *H12, RYO*
  17. H65
  18. *H13, RYO*
  19. H70
  20. P70
  21. *K2, KFB2* (=105 sts)
  22. *K2, KFB4* (=175 sts)
  23. *KFB* (=350 sts)
  24. *K2TOG* (=175 sts)
  25. *K2TOG* , K1 (=86 sts)
  26. P86
  27. H86
  28. H86
  29. H86
  30. Bind Off 30 sts
  31. S1, K1, *HP52*, K2
  32. S1, K1, *H52*, K2
  33. S1, K1, *HP52*, K2
  34. S1, K1, *H52*, K2
  35. S1, K1, *HP52*, K2
  36. S1, K1, *H52*, K2
  37. Bind Off
Purl side, front Purl side, back
Purl side, bobbles.
Purl side, closeup of the band. Purl side, closeup of the top.

I do believe that I may attempt to follow my own pattern and re-knit this one (perhaps for an article somewhere?). Orange definitely suits it, and the yarn (some cheap microfiber stuff), while not particularly easy to work with, is stiff enough and smooth enough to show the pattern nicely. Of course, it’s also unfriendly enough to show where I did the RYO’s, so I’m wondering if maybe I should find a better way of increasing for Herringbone. Maybe knit through one stitch, don’t drop it, and then knit through two stitches to make the herringbone as usual? Don’t know. It’s a hard one, because herringbone shows the stitches so clearly.

The other thing about herringbone is that the increase I was doing ended up being steeper than I’d expected, had I been doing plain knit stitches. In other words, to get that same steep point in knit I’d expect to do probably half as many increases. Strange.


This guy? This is the side view of a hat, done up in Lion Brand Chenille. I
think this was like my third hat ever, and it was my first experiment in
knitting something both round and flat. It’s also my first experiment
with cabling, even though it’s a simple 1 stitch cable.


Here’s a better view of the top. Needless to say, I wasn’t terribly creative
about closing up the whole in the top, and I believe I probably cast on way
too many stitches for the first row. I’m told, however, that the whole lets
out heat … yeah, okay. But it’s fuzzy and comfy, and it works.