Everyday Brown Bread

For those who’ve heard me talk about baking bread and don’t really want to “wing it,” here’s what I basically end up doing when I bake “sandwich” bread, or non-savory bread. If you want a savory bread, you’re looking for the recipe at Barley Boules, which can also have olives added to it & give you olive bread. The recipe below is for people who shy away from true Whole Wheat bread; if you want (and I do), you can simply swap Whole Wheat for the White flour & you’ll be OK.

Basic Everyday Bread:

  • 4C water
  • 2C whole wheat flour
  • 2C white flour
  • 1C Quinoa flour (optional, but recommended)
  • 2C Flax Seeds (I use golden, but it doesn’t matter except in appearance: dark seeds make mottled looking bread)
  • 1/2C Oat Bran
  • 1/4C Wheat Germ
  • 1C Molasses
  • 1/2C Honey
  • 1 Tbsp sugar
  • 2 Tbsp Yeast (not the rapid-rise junk!)
  • 1 Tbsp salt
  1. Proof yeast in bottled / filtered water (bring water to 105-110 deg. F, add sugar, add yeast, wait 10 min’s for it to “bloom”).
  2. Add whole wheat flour (and Quinoa flour, if you’ve got it) to water & cover with plastic wrap (I put a heating pad on low underneath the bowl if the house is cool). Let this rise until tripled in size.
  3. Add honey and molasses and mix in white flour until you have a very moist dough-ball (don’t add too much!). Let this rise until doubled in size.
  4. Add the dough ball & then set the mixer to knead the dough. Let it knead until you’ve got the consitency of chewing gum – don’t worry, you could go for about 15 minutes and not overknead. I’ve had the Kitchenaid overheat ’cause I let it go so long, and it was just fine.
  5. Add all the seeds, bran, wheat germ, and the salt (don’t forget that, whatever you do, ’cause it controls the yeast growth) to your Kitchenaid’s mixing bowl along with a little bit of white flour, and let it knead at least until all of the seeds have been incorporated. Keep adding little bits of white flour to keep the dough from sticking to the sides, as needed.
  6. Dump out onto a floured surface and let rest for a bit; divide into 4 loaves; shape and place into oiled loaf pans; spray tops with olive oil; cover with plastic and let them rise until they’ve almost doubled in size. (You can tell that they’ve risen enough if, when you poke them gently, the dimple doesn’t really want to spring back)
  7. Place into a 350 deg. F oven & bake until interior temperature (probe thermometer, here) is 190 deg. F. You can go a bit darker or a bit lighter than 190, but not more than 5 degrees lighter or you’ll have raw dough.
  8. Let cool in their pans for about 10 minutes, so they “sweat” and release from the pans.
  9. Cool on racks, covered with a tea-towel, overnight & they’ll be easier to slice.

Spiced Chocolates

More for today’s avoidance of work (by posting recipes), here’s one which everyone should try, because it’s so easy and so good. The exotic ingredient in this recipe is “coconut cream” or “coconut powder” which can be obtained at your local Asian market. If you can’t find it, you can simply go with powdered sugar, but … well, coconut cream doesn’t add any sweetness to the mix, so I think it’s better:

Fudge Truffle Centers (if you can wait that long):

  • 4 oz unsweetened chocolate
  • 1 can sweetened condensed milk
  • 1 cup sugar
  • 1 Tbsp vanilla
  • 1/8 tsp freshly cracked black pepper (fine)
  • 1/8 tsp freshly grated nutmeg
  • 1/8 tsp chipotle or cayenne powder
  • 1 teensy pinch of ground cloves
  • powdered coconut cream
  • powdered ginger

Boil chocolate, sweetened condensed milk, sugar, & spices until you feel as if it’s about to burn (about 3 minutes), stirring constantly. Remove from heat, add vanilla & stir until incorporated. Pour immediately into a pan & let cool. Cut into equal portions & roll into balls & then roll in coconut cream / ginger mixture. Let sit at least 12 hours before serving, as the coconut cream will draw moisture & form a shell. The longer you wait to eat them, the better they end up tasting! If you’re going to incorporate them as centers to truffles, you’ll want to dip them first, so that they don’t make your finishing coat all dusty with the coconut cream powder.

Lemon Death

This one’s something to make about once a year, and to have lots of friends around to help you eat, because it’s all about being special. I picked this one up from a coffee shop I worked for when I was in college. They’ve since gone out of business – probably due to killing their customers off with such rich food as this:

Artery-Coating Lemon Cake:

  • 5 Lemons
  • 2 Cups Granulated Sugar
  • 1¼ Cups Buttermilk
  • 4 Eggs
  • 3 Cups White Flour
  • 1¾ tsp Baking Powder
  • 1 tsp Baking Soda
  • ¼ tsp Salt
  • ¾ Cup Unsalted Butter, melted
  1. Mix Butter and Sugar until smooth. Add eggs one at a time, while mixing with a hand mixer. Set mixture aside
  2. Process Lemon Peels in food processor until the pieces are smaller than grains of rice – they should almost seem like a coarse flour.
  3. Mix Lemon Peels with remaining dry ingredients.
  4. Mix one third of the dry mixture into the creamed, then mix in one half of the buttermilk, then one third or the dry mixture again, then the remaining buttermilk followed by the remaining dry mixture.
  5. Pour into 2 greased 9″x5″ pyrex loaf pans. Bake at 325°F for 50 to 55 minutes. Allow to cool in the pans before removing to a platter, not to a cooling rack.
  6. Juice some of the lemons and mix juice with some sugar. Glaze cooled, sliced cakes with this mixture to taste.

Warning: Failure to follow the steps will result in utter failure! This is a suspension cake – which means that it won’t ordinarily come together to make a cake, but will result in something far from anything edible! It is important that each grain of sugar be coated in butter and then egg, and that each granule of lemon is coated with flour. In this manner, the particles are suspended. Over-mixing will destroy this suspension, as will trying to rush the thing together. Just follow the directions!

Fiber Bombs

We started these off with a basic carrot cake recipe, and it’s morphed to the point where we don’t believe they’re the same thing whatsoever. We call them Fiber Bombs because there’s so much danged fiber in them, and because they really have an effect upon your system, especially if you’re one who’s a stranger to fiber. To us, they’re just snacks, but to my coworkers? Well, let’s just say “colon health,” shall we?

Fiber Bombs:

  • 1/2 cup pecans or walnuts, toasted and coarsely chopped
  • 2 cups grated raw carrot (about 2-3 carrots)
  • 1 large apple, grated
  • Some Raisins (to preference – maybe a cup or two)
  • 2 cups (280 grams) all-purpose flour (or White Whole Wheat)
  • 3/4 cup golden flax seeds
  • 1/4 cup wheat germ
  • 1/4 cup oat bran
  • 1/4 cup sugar
  • 1/2 cup honey
  • 1/2 cup molasses
  • 3/4 teaspoon baking soda
  • 1 1/2 teaspoons baking powder
  • 1/2 teaspoon salt
  • 1 1/2 teaspoons ground cinnamon
  • 1 cup coconut (unsweetened. if using sweetened, omit the sugar)
  • 1 cup water
  • 1/2 cup flax seeds, ground
  • 3 tbsp olive oil
  • 1 1/2 teaspoons pure vanilla extract
  1. Preheat oven to 350 degrees F (180 degrees C) and place rack in center of oven. Place paper liners in 18 muffin cups.
  2. Toast the pecans or walnuts for about 8 minutes or until lightly browned and fragrant. Let cool and then chop coarsely.
  3. Finely grate the carrots and apple (an Asian Mandoline works fabulously for this). Set aside.
  4. In a large bowl whisk together the flour, sugar, baking soda, baking powder, salt, and ground cinnamon. Stir in the nuts and coconut. Set aside.
  5. In a separate bowl whisk together the ground flax seed, water, oil, and vanilla extract. Fold the wet ingredients, along with the grated carrot and apple, into the flour mixture, stirring just until moistened. Evenly divide the batter between the prepared muffin cups and bake for 20 – 25 minutes or until a toothpick inserted in the center comes out clean.
  6. Remove from oven and let cool on a wire rack. After about 10 minutes remove the muffins from the pans and cool completely on a wire rack.

Cranberry Muffins

I thought it appropriate that, for post number 99, I should throw a recipe out there. After all, this site’s about not being able to bake things as often as we’d like, at least in part. So, without further ado, and for Writegrrrl because of the loss of her email:

Cranberry Muffins:

  • 1C Xylitol
  • 2C Sugar
  • 6C White Whole Wheat Flour (King Arthur), Sifted
  • 2/3C Flaxseed, Ground
  • 3C Water
  • 1 Orange’s Zest, finely chopped
  • 1 Orange’s Juice
  • 1 Tbsp Vanilla
  • 2 Packages Cranberries
  • 1C Candied Ginger, Chopped
  • 5 Cloves
  • 1 Inch Cinnamon Stick
  • 1 “Arm” of Star Anise
  • 8 Allspice Berries
  • 2 Tbsp Baking Powder
  • 1/2 Tbsp Salt

Grind spices along with Flaxseed and add to the water, orange, vanilla, sugars. Mix in everything else until you have a smooth batter – you could go “muffin method” here, or could mix until it’s as smooth as cake batter. Either way, it works. After all that, add in the cranberries, drop into muffin tins and/or cake pans, and bake at 350 until a toothpick comes out cleanly.

Higher Education Woes

Went to Reading The World IX Conference this weekend. It was marvelous to be back in an academic setting, if only for a weekend, and to actually participate in learned discourse and dialogue about important topics. I may have to go get a PhD. My brain hurts, and I want more.

Will write more when I’m able to think: the hotel we stayed in was all of 1 block from San Francisco’s Tenderloin district, which means that they provided ear-plugs for the guests to use while sleeping. These only worked somewhat.

Greetings

I’m the new contributor DaviMack was talking about almost two weeks ago. I’m new at this, and not the best blogger ever. I’m young and inexperienced at this, and quite a fast knitter, in my kind of projects. I’m English and German, so what can I help knitting English the way I was taught. I’ll work on getting some pics for some projects, but don’t use a camera much, and all of them are pretty small insignificant ones, but they can make me some money, like hats, nothing fancy. I better work on some worth showing. TTFN

Blueness


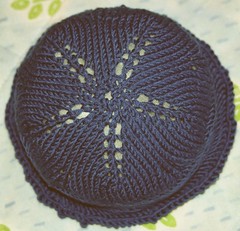
Blue Hat, Purl Side

At long last, the hat and scarf pair are finished! Instead of doing a series of 10 single increases, as I’d done with the yellow hats, I went with 5 double-increases. I used a simple yarn-over, so that it’d come out lacy like this, and then broke the line when I was close to the width I needed, adding a series spaced out in the middle of the open spaces, to give me a butterfly-like effect towards the edges. I followed this up with about 10 rows of herringbone, and finished with a single row of plain knit & a single bindoff.


Blue Hat, Knit Side

As you can see from the knit side, the last row of knit & then the bindoff gives a bit of a frill to the edge … not what was intended, but it works well enough, and is fairly subtle. I’m going to have to find a different bindoff for herringbone, as it’d be nice to have a plain bindoff option for those things which don’t really need the lettuce-edged effect.


Scarf, closeup

To go with the hat, I knit up a scarf. I used a two stitch selvage, coupled with paired decreases & a double-increase, to keep with the pattern of the hat. You get a good idea of how narrow the scarf is when you see it up close; it was knit on US size 6 needles.


Scarf, zoomed out a bit.

This’s after I’ve pulled the pins out, so the edges have pulled in quite a bit. I maybe should’ve gone with a different selvage for the edges, as they really want to curl, even after blocking. But, the edges aren’t what it’s about, so I suppose it doesn’t matter all that much.


Scarf, way out, no end in sight!

And, it just keeps going and going and going…. It’s about 6 feet long, to make up for some of the narrowness. The pattern is:

  • Cast on 15 stitches
  • Knit 1 row
  • Purl 1 row
  • *
  • Odd Rows: Sl1, K1, K2TogTBL, K3, YO, K1, YO, K3, K2Tog, K2
  • Even Rows: Sl1, K1, Purl 11, K2
  • *
  • Sl1, K1, Purl 11, K2
  • Sl1, K14
  • Sl1, K1, Purl 11, K2
  • Bind off


Hat and Scarf, finished

The finished pair! The scarf took longer, by far, for some reason. I guess that, yes, it does have more stitches … but it just seems so much smaller when you look at it!

The set’s being worn right now … with the purl side out, as is her propensity. Sigh. The request was for a hat which didn’t have frills, and would simply hug her head.

Sometimes I think that we need to move to a colder clime, simply so that the knitting will have a longer wear time. Speaking of which, I’m told that the Anemone Hat has settled in happily with our little friend in Portland, and is being dragged around as a clutch-purse when other hats need to be worn … and when it can’t be worn on top of or beneath said other hats.

The Skinny on Hominy – or Posole

You got me thinking about hominy.

I have had a yen for those roasted garbanzos, and since I got questions about that great hominy thing, I now want them, too!

Hominy, also known as posole, or pozole: large kernels of blue or white corn that has been treated with slaked lime to remove the tough outer husks of the kernels. It’s corn without the germ, it’s the same stuff used to make grits and hasty pudding.

And let me tell you: hominy is tasty. It’s the ultimate comfort food, marginally healthy, but good for a treat.

Like garbanzo beans, hominy comes in cans. Drained and patted dry and oven roasted, they will approach the goodness that they have in Peruvian cuisine; somehow at the Peruvian restaurant, the skin seems to be intact. I’m still in search of a recipe for the oven roasted, curry-seasoned roasted snacks and I’ve found them sold dry roasted like chips… stay tuned; I’m still looking for a recipe…!

Better than Fair Trade

Knitting last night, I happened to flip channels to Link TV. They’re doing some sort of pledge drive, but despite the pledge drive bits they were managing to air a good piece on Fair Trade Coffee, and also a group called the Community Agroecology Network. They’re a nonprofit corporation which will arrange for you to buy coffee directly from the farmers. No middle-men … well, actually, there is one middleman: the cooperative. The cooperative blends, roasts, and ships the coffee directly to the consumer, while retaining a portion to provide scholarships to the farmers’ kids. Not much of a middle-man, in my book.

Now, If you know me, you know that I’m … well, into coffee. I’ve gone through dozens if not hundreds of varieties in search of that perfect cup: one which is equally tasty with milk or soy, or with no creamer, sweetened or unsweetened, hot or cold … and straight out of the French press, day-old, for those mornings when I just can’t stop to make up a fresh pot and must get out the door in a hurry. Much to my chagrin, I’m probably going to have to investigate a new coffee. After my long trials, I’d settled on Ravensbrew’s Espresso Chocolón, which is a sustainably grown, shade grown, “relationship” coffee. However, in keeping with the idea that middlemen basically do what the postal service does, but at a much higher price … I’m going to have to at least taste this other coffee.

I also told my CSA about it, so that maybe the CSA could distribute coffee in their weekly produce boxes, and we’d get a broader audience for this type of coffee purchasing. Because, even if I don’t end up liking the coffee as well, it’s something worth of pursuing.

When you really look at the coffee market (second largest in the world, only behind Petroleum), you find that Nestle, Kraft, Proctor and Gamble, and Sara Lee are the current Big Four of coffee importers, providing about 80% of the United States’ coffee. Kraft … which would be a piece of a company named Altria, which used to be named Phillip Morris. Yup, your coffee’s brought to you by the guys who really didn’t believe you could get cancer from smoking … and still don’t, probably. Here’re the brands which I’m familiar with, and who owns them:

  • Gevalia, Maxwell House, Sanka, Yuban (Altria aka. Phillip Morris (via Kraft Foods))
  • Folgers and Millstone (Procter & Gamble)
  • Nescafé, Nespresso, Taster’s Choice (Nestle)
  • Senseo (Sara Lee)

You can check out The Coffee Geek to learn more about how the story of the coffee markets, or you can check out Wikipedia to take a look at who owns your morning cuppa. More than that, though, as interesting as it is … you could get on over to the Community Agroecology Network to learn about the folks who actually produce your coffee.

Tomorrow, you can think about where your chocolate comes from.