Succulent Succor


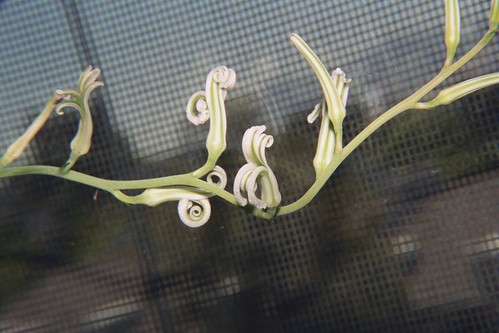
This dear little plant has been with us now for about six years, and is finally feeling well enough that it’s giving us some flowers! We picked it up in a pot containing less than one teaspoon of dirt … and a substantial amount of glue! It was one of those pots with a suction cup on it, and was meant to be stuck to the refrigerator or something. As if living things should be refrigerator baubles!


So, we took it from its pot – a feat involving a knife, much coaxing, and a pair of scissors with which to extract the roots – and repotted it. It lived in a little mustard pot for a few years, and grew larger, until we finally gave it its current home … in a coffee mug which had developed a crack.


It’s been happily living in the coffee mug, in various window sills, for several years now … and has been growing steadily all this time. It’s now about three inches across and three inches high.

We didn’t expect anything of it, and have simply been enjoying having a little plant which doesn’t seem to mind infrequent waterings or adverse conditions. So, when it began to develop a flower spike, we were excited!

So we waited. And waited. And waited some more. And finally gave up on anything happening, except for maybe thinking that we’d get a few seeds or something, because it was just taking sooo long for anything to happen. We were finally rewarded, though, with tiny little flowers which started off being light green, and now are … well, not light green. Don’t ask me what color they are, but I’m going to guess that they’re kind of pink. Sort of. Or off-white towards pink, at least. But with green stripes.

How Does the Garden Grow?

The garden … limps along. This year’s been a rough one, for some reason. We’ve had strange weather – with long periods of cool, punctuated with intense heat for a few days in a row. We’ve had several variety of grasshopper – the monster green ones, and the little tiny green ones, too. We’ve had black aphids. And we’ve had no peppers survive, no okra survive, and very slow growth on the tomatoes: they’re only 3 feet tall, when they should be at least six and bearing fruit by now.

The Amaranth is already trying to go to seed, so I’m worried about it as well, and the kabocha is already starting to fruit, when it should be sending out long tendrils to conquer the rest of the garden.

Sigh.

Ode to a Camera

Quite often, I include pictures along with whatever I’m blogging about, but that’s going to have to pause for a while, because The Camera is going into the shop. It’s 4 years old, and I’ve shot hundreds of rolls of film with it, so I suppose it’s about time for a tuneup.

But I’ll miss it while it’s away.

I realized, this morning, when I’d finished speaking with the factory repair people, that I love this camera. It’s strange, to love a thing. I don’t know that I’ve had the experience before, except, perhaps, for my violin, and that’s kind of … different.

The camera provides me with a challenge, in that it’s got many more options than I’ve ever used, and can somehow keep on giving me new things to know, each and every time I paw through the manual. And, yes, I still have the manual … and the original sales receipt.

So, today it’s going in the post, and I’ll be relying on the … digital camera. Sigh.

Legal Thoughts in the Morning

Early this Independence Day, we’re checking email & began to discuss the rights of bloggers. Kinda appropriate, I suppose. Kinda strange, to have been asleep half an hour ago. But there it is.

I’m particularly interested, not in the legal aspects of “speaking,” as it were, but in the aspects of commenting. For example: if you comment upon someone’s blog, who “owns” that comment? All blogging software provides for the deletion of comments … which would imply that, at the very least, the blogger has the “right” to mediate comments, to some extent. But there are several blog-writing packages out there (other than blogger) which allow the owner of the site to edit comments; to change them entire. This would seem to imply that your comment, once made, has become the property of the site owner.

It’s a stretch, yes, but it’s being established by precedent all over the blogsphere. Now, what I’m thinking is this: if someone edits your comment but does not also change the attribution, are they actually infringing upon your legal rights by implying that you made the statement that they are attributing to you?

To state it differently, let’s pretend that you work for the world’s largest pea-processing company. You’re commenting upon somebody’s blog, and you said said, “I like peas,” and the owner changed that statement to “I absolutely hate peas.” You are being misquoted, as it were. You could suffer all manner of ill effects, because you work for this pea-processing company, and if they find out that you hate peas, well … let’s just say that you’re going to be doing the nasty jobs for a while, at best.

So, to me, comments are still the property of the commentor, while existing upon the site at the discretion of the commentee. If you, as a commentor, may be held liable whatsoever, then the comment must be yours in property terms. Now, there’s a whole other world out there in terms of liability law, apparently, and I don’t really care about it. What I’m interested in at the moment are the questions of property; when you make a comment, who “owns” those words?

As far as I’m concerned, any comments may remain your property as long as you want them. Considering that you, as the commentor, may delete them at YOUR whim, I’d say that blogger has essentially already weighed in: if blogger is establishing law by precedent, then the commentor is the owner.

Now, off to make breakfast. And to enjoy this day full of people who don’t have to go to work. Ahh, mass leisure.

Bloggers' Rights at EFF

Using Garam Masala: Chai Tea


As I’d said in my post on making Garam Masala, we like to do up our own. As to what to do with it, well, we usually end up using it in shakes or in various sweet dishes, but as I was making my morning pots of tea (I have two French Presses … so I make two), I realized that I’d left out an important bit: you don’t necessarily end up with one batch when you grind whole spices into masala.

You see, when you grind up all of your spices using a blade grinder, you usually get sick of the whole fine-mesh strainer process after about half an hour of grinding, sifting, grinding, sifting… so you just give up & bodge the larger bits into a jar & leave well enough alone. What to do with the leftovers, though? Well, if you’re like me, you put them into cheap black tea, and have your own version of Chai Tea. You get a subtly different flavor from the coarse bits than from the fine bits, primarily because the pieces which get left behind tend to be largely comprised of coriander hulls. But there’s enough of the other spices to give you that distinctive Masala flavor, and it’s a good use of something which would sit until chutney-making season. Of course, for the decaffeinated version, you can still use the fine-powdered Masala with your hot soy-milk & a bit of sweetener, but for the tea version, the coarse grind make for a clearer brew.

The Tofeta Experiment, Part II

Now, we hadn’t forgotten that we were going to try and really do something with tofu, but sourdough starter… sort of takes over the world when it gets going. But eventually we knew we had to make tofu again — after all, freshly ground chai-spiced soy milk and hot cocoa tastes best with fresh soy milk. We finally had a good excuse — well, another good excuse, anyway, to pull out the beans.


The other night, we put a pound of dried soybeans in to soak, and started the usual drill: beans double in size and are drained, then ground in the blender and the resulting white goopy paste is boiled in a monster pot for twenty-five minutes after its first foam appears.

(NOTE: If there’s ever any doubt about whether or not the foam has appeared…? Then it hasn’t foamed. It’s like watching what happens when you put dish detergent into the washing machine. BIG bubbles, fast.)

Normally, after this step, the okara is cooked and rises to the top. Usually, we simply take the milk off the heat, then pour it through a muslin strainer. This time, multi-tasking led us to leaving it on the stove. It grew a skin. A light went on in our brains. “Hey! We made yuba!” Yuba is a thin bean curd… skin that is sometimes fried in Chinese restaurants and served with various spices as “Buddha’s (Buddha being a vegetarian Deity.) “Mock Duck,” (recipe via The Vegan Feast Kitchen). Yuba is very high in protein — higher than either tofu or milk. Seasoned and fried or eaten with condiments, it’s quite tasty – but pretty high maintenance to make if you’re making soy milk from scratch…

So, we set aside our Yuba Quest for another day, and continued on our path. We loaded the okara on drying screens and then pondered the hot soy milk. Our original quest was to experiment our way toward something like feta. We’ve seen recipes for something like ricotta, with cashews and almond, but we wanted to create something …else.
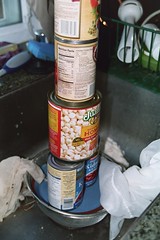

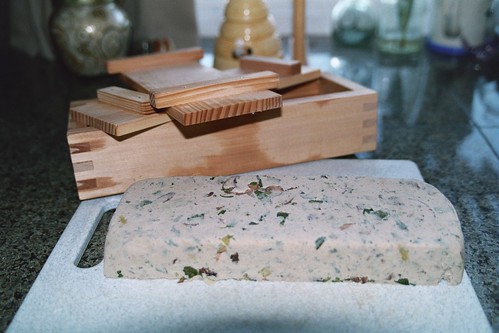
“What if we flavored it?” one of us asked. (Who knows which one of us. Genius generally strikes anonymously.) “Well, we’ve got these dried leeks and mushrooms…” the other of us mused. The consensus of “why not?” meant that before adding coagulant, we added a quarter cup of whole, dried sage, two cups of dried leek pieces and about two cups of dried champignon mushrooms. Then we added the coagulant, poured it through the strainer (sheer polyester mesh, since with the newly organized kitchen, who knows what happened to the rest of the cheesecloth and muslin) into the molds (one a Japanese sushi mold, not really meant for tofu, but it works, and it’s beautifully made, so it gets used, and the other “mold” is a stainless steel strainer. With a dish and cans on top of it for weight Again: it works.), and we waited.

Our first fear was that the coagulant — magnesium sulfate, and truly awful, if you’ve ever had the misfortune to taste it — would alter the taste of the vegetables put into the soy milk — but since the horribly sourish-bitterness is undetectable in homemade tofu, we took our chances. Our second fear was that we should maybe have added something else — the leeks were making it look a little greenish. Maybe we should have added saffron or turmeric. Perhaps the consistency would be strange.

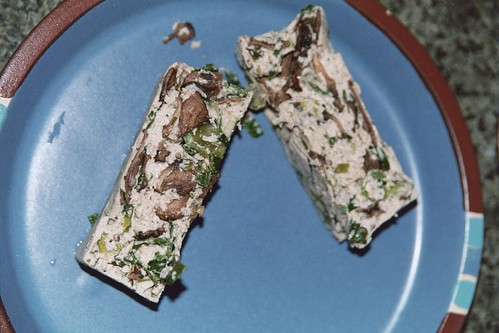
Well, as you can see, we worried needlessly. You can SEE what it LOOKS like. My goodness, I wish you could smell and taste it. Think of savory onions and mushrooms…

Many people are ambivalent about tofu, thinking “meh” because it is basically white, somewhat gelatinous (if it’s silken, really gelatinous), and entirely tasteless (unless it’s made from a stronger milk source and then it has a heavier soy flavor that still basically tastes like… not much). Many view the vegans and vegetarians who enjoy it as humorless (and tasteless) ascetics, but I’m here to tell you that I don’t bother eating things that don’t taste good. This. Tofu. Tastes. Good.

If we were coming up with a name for this, I would say it is ganmodoki-style — almost. Ganmodoki is a Japanese method of mixing crumbled tofu, vegetables and mountain yam (yama-imo) and forming it into patties or balls and deep frying it. Without the yams (darn) or the frying, this is close. We could simply call this ‘flavored tofu,’ or ‘vegetable tofu,’ but we’ve been calling it …quiche. I know. That name’s taken.

We ate this “raw,” and warm, straight from the press with just a little soy sauce, and it was really nice. We baked it with a smidge of olive oil, and about a teaspoon each of garlic powder, salt, curry powder, freshly ground black pepper, and smoked torula yeast, and wow — it took on subtle flavors that were unexpected. Paired with a green salad, it becomes a most satisfying egg-and-onion pie. Lightly stir fried and paired with grilled tomatoes, it’s amazingly like a breakfast bake of eggs and mushrooms. It’s an unbelievably versatile food, and now we’re wondering: why stop at tofeta? The possibilities are endless…

Pumpernickel 2.0

It was difficult for me, but I held back from adding any truly interesting ingredients to this bread. It’s the first attempt, you see, at trying to duplicate Westphalian Pumpernickel bread. After my first attempt, I did a bit more research, and arrived at the Wiki article, and then realized that what I’d been making was American Pumpernickel. Long article short (for those who don’t want to go there), American Pumpernickel adds a whole bunch of things to duplicate the color of Westphalian Pumpernickel (namely chocolate, molasses, prunes and the like) and also adds Caraway Seeds in an attempt to duplicate the flavor.


So, I held back on the things I’d usually throw into a savory bread, and ended up with a truly basic, sourdough rye. I started it off with 1 cup of my sourdough starter, but everything past that point was rye. I fed it on rye flour, gave it whole, steamed rye berries, and stirred it every couple of hours for two days (except at night, of course, because that would’ve awakened the birds, who would awaken the rest of the house). It was necessary to let it sour to some degree, because rye flour tends to be a bit alkali, so yeast doesn’t work properly unless you let it sour or give it something to acidulate the flour. Next time I won’t let it go quite so long, as it is truly a sour bread.


I was told at the time that I should have let it raise a bit more, but I was concerned about not letting it over-rise. I shouldn’t have worried, and should’ve let it go, because I ended up with quite a dense couple of loaves. That said, though, the incorporation of such a quantity of whole rye berries gives a good, chewy texture, and the aroma is uniquely rye: slightly bitter, slightly floral, somewhat reminiscent of barley, but its own. Baked at 250°F, the crust is essentially nonexistent. As you can see, it slices quite thinly, which isn’t possible with wheat, necessarily. I don’t know if it’s due to the density, or due to the lower gluten content, but it certainly lends itself to those strange little sandwiches one encounters at parties.

Whole Spices

I don’t know if you all have figured it out yet, but we buy whole spices.

Other people go to the warehouse stores for food … we order from an herb & spice importer. Not only do we get a tremendous discount over what we’d pay at the supermarket, we get fresher, higher quality herbs & spices. We also get forced into using a whole lot more herbs & spices, because, really, who can afford not to use them in profligate amounts when they’re taking up cabinet space?

I’d finally run out of brown mustard seed (it took me about a year), so I ordered two pounds this time. It’s truly irritating to run low on such a staple. Yes – mustard seeds are a staple, because they go in just about every batch of sourdough bread, to the tune of about 4 Tablespoons. Same with yellow mustard. The caraway seeds are by way of experimenting, as are the celery seeds and psyllium husks (we’re going to try to incorporate those into protein bars, so that they’re not so … slow in the system).

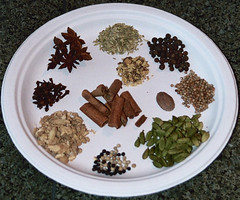
All this is, of course, by way of sharing the sheer quantities of spice we buy, and because I was told that our recipe for scones was intimidating in its sheer number of ingredients. When you’ve got a pound of whole cloves, a pound of star anise, a pound of fennel seed, and 1-pound bags of just about every other spice which might go into a recipe? Well, you use them! And you get familiar with them! And you learn how to balance them against one another, and you experiment more with them, and cooking becomes much more fun.

Now, to reorganize the cabinets, because we’re out of room. And out of spice cannisters. Sigh.

Apricot-Orange Scones


I’m going to present two methods to the following recipe: one for those who’ll be using a sourdough starter, and those who’re simply interested in making scones. If you’re not using the starter, you’re still going to be OK, because using a sourdough starter doesn’t add any mass to the party – it simply means that you’re going to let your starter play around in the flour & filtered water for a bit, and then you’re going to remove the same portion as you’d added. So, using a sourdough starter results in zero added liquid or solid to the recipe (we’ll ignore the bacteria and yeast). The sourdough changes the equation very little, except in terms of time, so it’d probably be easier to do this recipe without the sourdough … but, if you’re like me, you’ve got a starter sitting in the fridge, sulking, and you use it every chance you get, because baking bread twice a week is a bit much, but that’s what keeps the starter happy.

Apricot – Orange Scones:

  • Sourdough Starter
  • 5 C Whole Wheat Flour
  • 5 C Whole Oat Flour
  • 1 C Oat Bran
  • 1 tsp Salt
  • 2 Tbsp Baking Powder
  • 1/2 tsp Baking Soda
  • 2 C Filtered Water
  • 1 C Unsweetened Soy Milk
  • 1/2 C Sugar
  • 3 Tbsp Molasses
  • 3 Tbsp Honey
  • 3 Tbsp Maple Syrup (substitute Honey if you don’t use Maple, and vice versa)
  • 2 Tbsp Olive Oil
  • 1 tsp Vanilla Extract
  • 2 tsp Almond Extract
  • Zest of 1 Large Orange, Chopped
  • 1 C Dehydrated Apricots, cut into ribbons
  • 2 Tbsp Ginger Powder
  • 2 Cardamom Pods, seeds only, ground
  • 1 tsp Cloves, ground
  • 1 tsp Cinnamon / Cassia, ground
  • 1/4 tsp Nutmeg, ground
  • 2 Tbsp Fennel Seed, whole – don’t grind

    If you’re using sourdough starter, go through feeding & prepping step:
    Add filtered water to sourdough starter; add wheat flour to hydrate enough so that your starter can “feed” for several hours. After starter has fed, mix in enough wheat flour to bring it to the same consistency it was when you removed it from its home; remove same quantity of starter back to its home.
    Continue, or if you’re not using sourdough starter, simply start here:
    Mix dry ingredients, spices, fruit, and zest in one bowl, reserving some of the flour so that you don’t end up too dry (you can always add it, you can’t ever get it back out). Mix wet together in a separate bowl (sugars count as “wet” in this game). Add the wet to the dry and fold to combine, as you would biscuits. Turn out onto a floured board, knead briefly until the dough just comes together, then roll into a sheet approximately 1 inch thick. Sprinkle tops with sugar. Cut into triangles (I use a pizza cutter, cut into squares, then run through on the diagonal), place onto an oiled baking sheet, and bake at 400°F (205°C) for approximately 12 minutes, being careful not to overbake (you can always toss them back into the oven). Remove to cooling racks … or, you know, to your awaiting plate.


Disclaimer: this recipe was something whipped up today without a “base” recipe, and, thus, quantities listed are rather approximate (except for the baking powder & soda). This works for us because we can feel our way through. I strongly encourage you to reserve quantities of flour out, or to add more flour if needed, because the addition of flour to things in our household involves tipping a 5 pound sack and stopping when it looks to be a goodly amount.

This recipe yielded about 40 scones. They lasted a day – most were given away, but there were casualties. Be warned.

Apricot Windfall


It’s occasionally nice to have friends and relatives who are picky about food, because we end up with such things as all of the apricots we could pick. They’d started to fall from the tree, so we hurried over with a long stick & helped them along, giving us nearly 10 pounds of apricots (yes, I weighed them). Now, we could have eaten them … but that would probably result in all sorts of intestinal distress, as they were nearly all ripe, and the half which weren’t ripe when we picked them were ripe a day later. So, instead of gorging ourselves into illness, we dried them.


I don’t have any pictures of the little dried up halves, but I must say that they get really flat when you dry them cut-side down. The ones you get in the store have had the pits removed & have been dried whole, but I don’t own a pitter (I keep meaning to pick one up – for olives, mostly). So, it was a choice between ending up with them curling in upon themselves, and being wizened little nubs of apricot, or having very flat discs. Flatness won out, primarily because I think that we’ll be using these in fruitcakes, rather than just eating them. With fruitcake in mind, we dried them out until they were nearly crisp, so that they’ll keep over the summer without having to go into the deep-freeze.